Spark Streaming入门实践教程与编程基础指南
时间:2026-08-21 | 作者:清风无痕 | 阅读:0Spark Streaming编程初级实践
写在前面
- Linux:
CentOS7.5 - Spark:
spark-3.0.0-bin-hadoop3.2 - Flume:
Flume-1.9.0 - IDE:
IntelliJ IDEA2020.2.3
1. 安装Flume
Flume是Cloudera提供的一个分布式、可靠、可用的系统,它能够将不同数据源的海量日志数据进行高效收集、聚合、移动,最后存储到一个中心化数据存储系统中。Flume 的核心是把数据从数据源收集过来,再送到目的地。请到Flume官网下载Flume1.7.0安装文件,下载地址如下:
或者也可以直接到本教程官网的“下载专区”中的“软件”目录中下载apache-flume-1.7.0-bin.tar.gz。
下载后,把Flume1.7.0安装到Linux系统的“/usr/local/flume”目录下,具体安装和使用方法可以参考教程官网的“实验指南”栏目中的“日志采集工具Flume的安装与使用方法。
安装命令
tar -zxvf apache-flume-1.9.0-bin.tar.gz -C /export/server/
mv apache-flume-1.9.0-bin/ flume-1.9.0
sudo vi /etc/profile

export FLUME_HOME=/usr/local/flume
export PATH=$PATH:$FLUME_HOME/bin

source /etc/profile
mv flume-env.sh.template flume-env.sh
- 查看版本号
bin/flume-ng version

2.使用A vro数据源测试Flume
题目描述
A vro可以发送一个给定的文件给Flume,A vro 源使用A VRO RPC机制。请对Flume的相关配置文件进行设置,从而可以实现如下功能:在一个终端中新建一个文件helloworld.txt(里面包含一行文本“Hello World”),在另外一个终端中启动Flume以后,可以把helloworld.txt中的文本内容显示出来。
Flume配置文件
al.sources = r1
a1.sinks = k1
a1.channels = c1
a1.sources.r1.type = a vro
a1.sources.r1.channels= c1
a1.sources.r1.bind = 0.0.0.0
al.sources.r1.port = 4141
a1.sinks.k1.type = logger
a1.channels.c1.type = memory
al.channels.c1.capacity = 1000
a1.channels.c1.transaction = 100
al.sources.r1.channels = c1
a1.sinks.k1.channel=c1
执行命令
- 先进入到Flume安装目录,执行以下第一行命令;
- 开始新的一个会话窗口,执行第二行命令写入数据到指定的文件中
- 查看上一步骤中指定的文件内容
./bin/flume-ng agent -c . -f ./conf/a vro.conf -n a1 -Dflume.root.logger=INFO,console
echo 'hello,world' >> ./log.00
bin/flume-ng a vro-client --conf conf -H localhost -p 4141 -F ./log.00
执行结果如下

3. 使用netcat数据源测试Flume
题目描述
接下来,需对Flume的相关配置文件进行一番设置,以达成这样的功能:在一个Linux终端(在此将其称作“Flume终端”)里启动Flume,而在另一个终端(将其命名为“Telnet终端”)中输入“telnet localhost 44444”这一命令。随后,当在Telnet终端中输入任意字符时,这些字符都能够顺利地呈现在Flume终端上。
编写Flume配置文件
al.sources = r1
a1.sinks = k1
a1.channels = c1
al.sources.r1.type = netcat
al.sources.r1.channels = c1
a1.sources.r1.bind = localhost
al.sources.r1.port = 44444
a1.sinks.k1.type = logger
a1.channels.c1.type = memory
a1.channels.c1.capacity = 1000
al.channels.c1.transaction = 100
al.sources.r1.channels = c1
a1.sinks.k1.channel = c1
- 执行以下命令
./bin/flume-ng agent -c . -f ./netcatExample.conf -n a1 -Dflume.root.logger=INFO,console
telnet localhost 44444
- 会话窗口成功得到数据

4. 使用Flume作为Spark Streaming数据源
题目描述
Flume作为一款广受欢迎的日志采集系统,能够成为Spark Streaming的高级数据源。将Flume Source的类型设置为netcat,在终端持续向Flume Source发送各类消息,Flume会将这些消息汇聚到Sink,此处把Sink类型设为a vro,通过Sink将消息推送至Spark Streaming,再由自行编写的Spark Streaming应用程序对消息加以处理。
编写Flume配置文件
al.sources = r1
a1.sinks = k1
a1.channels =  c1
al.sources.r1.type = netcat
al.sources.r1.bind = localhost
a1.sources.r1.port = 33333
a1.sinks.k1.type = a vro
al.sinks.k1.hostname = localhost
a1.sinks.k1.port = 44444
a1.channels.c1.type = memory
al.channels.c1.capacity = 1000000
a1.channels.c1.transactionCapacity = 1000000
al.sources.r1.channels = c1
a1.sinks.k1.channel = c1
主程序代码
import org.apache.spark.SparkConf
import org.apache.spark.storage.StorageLevel
import org.apache.spark.streaming._
import org.apache.spark.streaming.Milliseconds
import org.apache.spark.streaming.flume._
import org.apache.spark.util.IntParam

object FlumeEventCount {

    def main(args: Array[String]): Unit = {
        if (args.length < 2) {
            System.err.println( "Usage: FlumeEventCount  ")
            System.exit(1)
        }

        StreamingExamples.setStreamingLogLevels()
        val Array(host, IntParam(port)) = args
        val batchInterval = Milliseconds(2000)

        val sc = new SparkConf()
          .setAppName("FlumeEventCount")
//          .setMaster("local[2]")
        val ssc = new StreamingContext(sc, batchInterval)

        val stream = FlumeUtils.createStream(ssc, host, port, StorageLevel.MEMORY_ONLY_SER_2)

        stream.count().map(cnt => "Received " + cnt + " flume events." ).print()

        ssc.start()
        ssc.awaitTermination()


    }
}
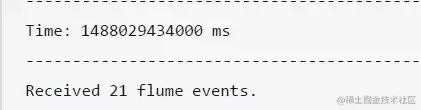
执行结果1

import org.apache.log4j.{Level, Logger}
import org.apache.spark.internal.Logging

object StreamingExamples extends Logging {

    def setStreamingLogLevels(): Unit = {

        val log4jInitialized = Logger.getRootLogger.getAllAppenders.hasMoreElements

        if (!log4jInitialized) {
            logInfo("Setting log level to [WARN] for streaming example." + " To override add a custom log4j.properties to the classpath.")
            Logger.getRootLogger.setLevel(Level.WARN)
        }
    }

}
执行结果2
全文结束!!!


