【目标检测入门】深刻理解yolov3并进行优化,最终实现交通标志检测
时间:2025-07-16 | 作者: | 阅读:0项目介绍 本项目是本人入门目标检测的第一个项目,主要向教程AI识虫项目为范例进行学习实现的,如果在本项目看不懂的代码请移步到基础教程之中里面有详细的介绍,在本项目中没有进行过多缀诉,在学习过程中我在基础教程上进行一些优化和改进。
前言:项目介绍及数据集介绍
1. 项目介绍?本项目是本人入门目标检测的第一个项目,主要向教程AI识虫项目为范例进行学习实现的,如果在本项目看不懂的代码请移步到基础教程之中里面有详细的介绍,在本项目中没有进行过多缀诉,在学习过程中我在基础教程上进行一些优化和改进:比如介绍了锚框大小的聚类方法和代码实现,评价指标mAP的实现方法,在数据预处理方面也加上了mixup操作,模型主干网络上也替换成mobilenetV3并引入了(Coordinate Attention:新注意力机制,助力分类/检测/分割涨点!)注意力机制等等。在本项目中还有值得注意一点的就是副本不参与代码执行,本项目中已经将其折叠,但执行也不会影响后面代码的运行,可以通过这些副本来深刻理解yolov3的原理。
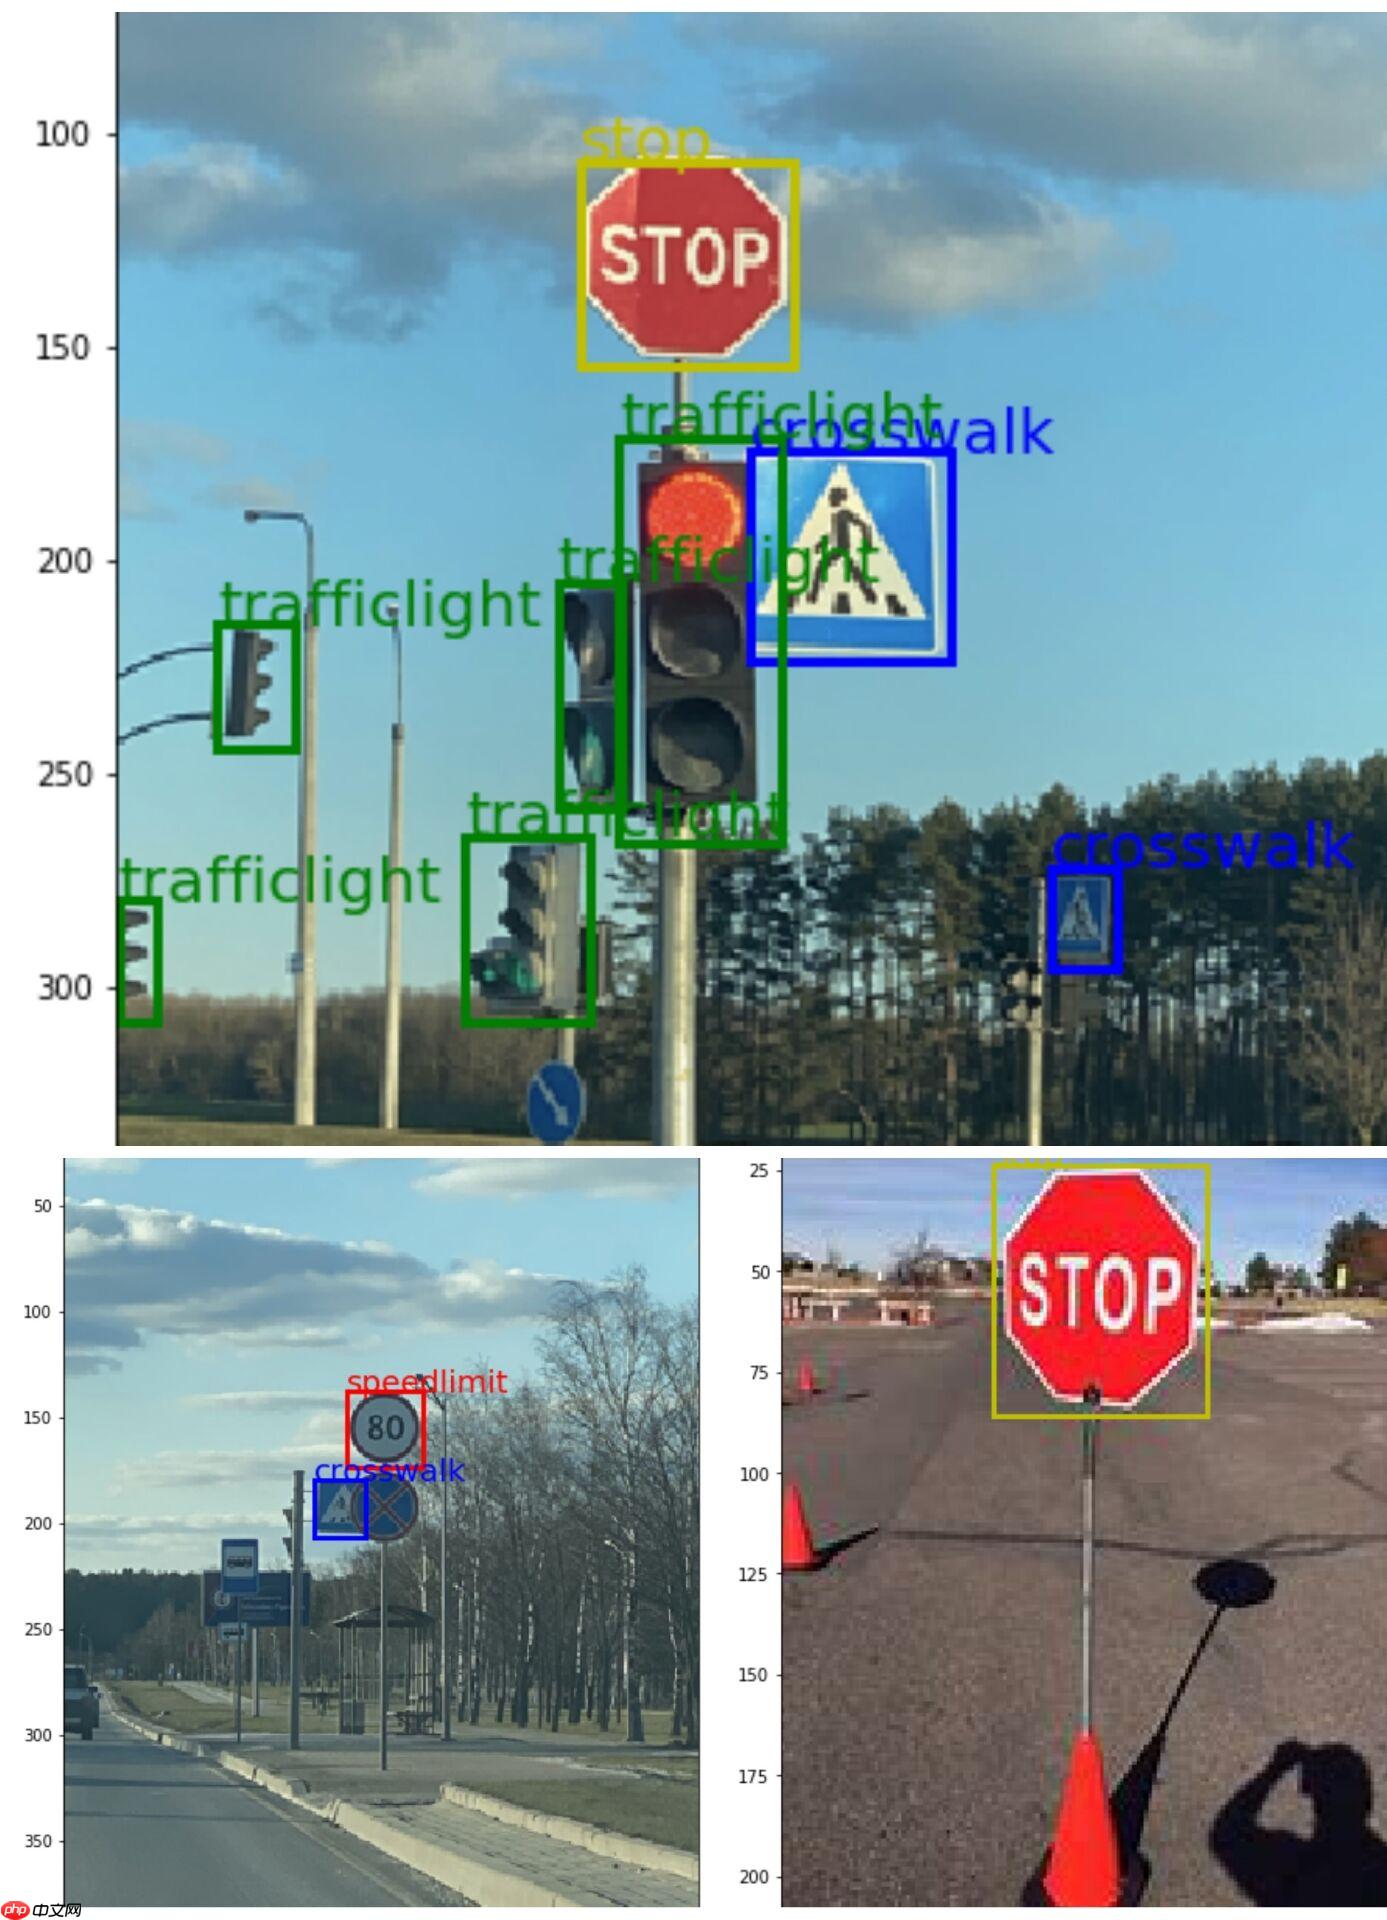
2. 数据集介绍?本次项目使用的是一个路标数据集:主要包含四个类别,这里以本项目检测出的预测结果来展示介绍,在此先附上数据集链接该数据集更多的详细介绍请移步到该链接,总共877张图本项目按照8:1:1的比例划分为训练集,验证集和测试集,从下面的三张图片可以看出此数据集包含了四个类别:crosswalk: 0 speedlimit: 1 stop: 2 trafficlight: 3:
#导入相关库import paddleimport paddle.nn as nnimport numpy as npimport osimport xml.etree.ElementTree as ETfrom paddle.io import Datasetimport paddle.vision.transforms as ptfrom PIL import Image, ImageEnhanceimport matplotlib.pyplot as pltfrom math import logimport randomimport sys, timeimport globimport cv2登录后复制In [?]
#解压数据集!tar -xvf data/data49531/roadsign_voc.tar !rm -f label_list.txt!rm -f train.txt!rm -f valid.txtif not os.path.exists('roadsign'): os.makedirs('roadsign')#需要改下名适应PaddleX的划分数据集的脚本!mv annotations roadsign/Annotations!mv images roadsign/JPEGImages登录后复制
一、数据读取处理
本次采用的数据集分为四个类别: crosswalk: 0 speedlimit: 1 stop: 2 trafficlight: 3
In [?]#使用paddleX快速划分数据集!pip install ”paddlex<=2.0.0“ -i https://mirror.baidu.com/pypi/simple登录后复制In [?]
!paddlex --split_dataset --format VOC --dataset_dir roadsign --val_value 0.1 --test_value 0.1#这里移动一下划分好的数据集到主目录下!mv roadsign/Annotations Annotations !mv roadsign/JPEGImages JPEGImages!mv roadsign/labels.txt labels.txt!mv roadsign/test_list.txt test_list.txt!mv roadsign/train_list.txt train_list.txt!mv roadsign/val_list.txt val_list.txt登录后复制In [?]
#首先将标签转化为数字:Lable_Map=['crosswalk','speedlimit','stop','trafficlight']label_dict={}for i ,item in enumerate(Lable_Map): label_dict[item]=iprint(label_dict)登录后复制
--1、定义预处理方法
本次对训练集预处理方法用到了随机对比度,色调,亮度调整;随机裁剪;随机填充,随机裁剪,以及插值方式不同的随机缩放,mixup。
In [11]#用于随机水平翻转def random_flip(img, gtboxes, thresh=0.5): img=np.array(img) if random.random() > thresh: img = img[:, ::-1, :] gtboxes[:, 0] = 1.0 - gtboxes[:, 0] return img, gtboxes# 随机填充def random_expand(img, gtboxes,max_ratio=4.,fill=None,keep_ratio=True,thresh=0.5): if random.random() > thresh: return img, gtboxes if max_ratio < 1.0: return img, gtboxes h, w, c = img.shape ratio_x = random.uniform(1, max_ratio) if keep_ratio: ratio_y = ratio_x else: ratio_y = random.uniform(1, max_ratio) oh = int(h * ratio_y) ow = int(w * ratio_x) off_x = random.randint(0, ow - w) off_y = random.randint(0, oh - h) out_img = np.zeros((oh, ow, c)) if fill and len(fill) == c: for i in range(c): out_img[:, :, i] = fill[i] * 255.0 out_img[off_y:off_y + h, off_x:off_x + w, :] = img gtboxes[:, 0] = ((gtboxes[:, 0] * w) + off_x) / float(ow) gtboxes[:, 1] = ((gtboxes[:, 1] * h) + off_y) / float(oh) gtboxes[:, 2] = gtboxes[:, 2] / ratio_x gtboxes[:, 3] = gtboxes[:, 3] / ratio_y return out_img.astype('uint8'), gtboxes# 随机缩放def random_interp(img, size, interp=None): interp_method = [ cv2.INTER_NEAREST, cv2.INTER_LINEAR, cv2.INTER_AREA, cv2.INTER_CUBIC, cv2.INTER_LANCZOS4, ] if not interp or interp not in interp_method: interp = interp_method[random.randint(0, len(interp_method) - 1)] h, w, _ = img.shape im_scale_x = size / float(w) im_scale_y = size / float(h) img = cv2.resize( img, None, None, fx=im_scale_x, fy=im_scale_y, interpolation=interp) return imgdef multi_box_iou_xywh(box1, box2): ”“” In this case, box1 or box2 can contain multi boxes. Only two cases can be processed in this method: 1, box1 and box2 have the same shape, box1.shape == box2.shape 2, either box1 or box2 contains only one box, len(box1) == 1 or len(box2) == 1 If the shape of box1 and box2 does not match, and both of them contain multi boxes, it will be wrong. “”“ assert box1.shape[-1] == 4, ”Box1 shape[-1] should be 4.“ assert box2.shape[-1] == 4, ”Box2 shape[-1] should be 4.“ b1_x1, b1_x2 = box1[:, 0] - box1[:, 2] / 2, box1[:, 0] + box1[:, 2] / 2 b1_y1, b1_y2 = box1[:, 1] - box1[:, 3] / 2, box1[:, 1] + box1[:, 3] / 2 b2_x1, b2_x2 = box2[:, 0] - box2[:, 2] / 2, box2[:, 0] + box2[:, 2] / 2 b2_y1, b2_y2 = box2[:, 1] - box2[:, 3] / 2, box2[:, 1] + box2[:, 3] / 2 inter_x1 = np.maximum(b1_x1, b2_x1) inter_x2 = np.minimum(b1_x2, b2_x2) inter_y1 = np.maximum(b1_y1, b2_y1) inter_y2 = np.minimum(b1_y2, b2_y2) inter_w = inter_x2 - inter_x1 inter_h = inter_y2 - inter_y1 inter_w = np.clip(inter_w, a_min=0., a_max=None) inter_h = np.clip(inter_h, a_min=0., a_max=None) inter_area = inter_w * inter_h b1_area = (b1_x2 - b1_x1) * (b1_y2 - b1_y1) b2_area = (b2_x2 - b2_x1) * (b2_y2 - b2_y1) return inter_area / (b1_area + b2_area - inter_area)def box_crop(boxes, labels, crop, img_shape): x, y, w, h = map(float, crop) im_w, im_h = map(float, img_shape) boxes = boxes.copy() boxes[:, 0], boxes[:, 2] = (boxes[:, 0] - boxes[:, 2] / 2) * im_w, ( boxes[:, 0] + boxes[:, 2] / 2) * im_w boxes[:, 1], boxes[:, 3] = (boxes[:, 1] - boxes[:, 3] / 2) * im_h, ( boxes[:, 1] + boxes[:, 3] / 2) * im_h crop_box = np.array([x, y, x + w, y + h]) centers = (boxes[:, :2] + boxes[:, 2:]) / 2.0 mask = np.logical_and(crop_box[:2] <= centers, centers <= crop_box[2:]).all( axis=1) boxes[:, :2] = np.maximum(boxes[:, :2], crop_box[:2]) boxes[:, 2:] = np.minimum(boxes[:, 2:], crop_box[2:]) boxes[:, :2] -= crop_box[:2] boxes[:, 2:] -= crop_box[:2] mask = np.logical_and(mask, (boxes[:, :2] < boxes[:, 2:]).all(axis=1)) boxes = boxes * np.expand_dims(mask.astype('float32'), axis=1) labels = labels * mask.astype('float32') boxes[:, 0], boxes[:, 2] = (boxes[:, 0] + boxes[:, 2]) / 2 / w, ( boxes[:, 2] - boxes[:, 0]) / w boxes[:, 1], boxes[:, 3] = (boxes[:, 1] + boxes[:, 3]) / 2 / h, ( boxes[:, 3] - boxes[:, 1]) / h return boxes, labels, mask.sum()# 随机裁剪def random_crop(img, boxes, labels, scales=[0.3, 1.0], max_ratio=2.0, constraints=None, max_trial=50): if len(boxes) == 0: return img, boxes if not constraints: constraints = [(0.1, 1.0), (0.3, 1.0), (0.5, 1.0), (0.7, 1.0), (0.9, 1.0), (0.0, 1.0)] img = Image.fromarray(img) w, h = img.size crops = [(0, 0, w, h)] for min_iou, max_iou in constraints: for _ in range(max_trial): scale = random.uniform(scales[0], scales[1]) aspect_ratio = random.uniform(max(1 / max_ratio, scale * scale), min(max_ratio, 1 / scale / scale)) crop_h = int(h * scale / np.sqrt(aspect_ratio)) crop_w = int(w * scale * np.sqrt(aspect_ratio)) crop_x = random.randrange(w - crop_w) crop_y = random.randrange(h - crop_h) crop_box = np.array([[(crop_x + crop_w / 2.0) / w, (crop_y + crop_h / 2.0) / h, crop_w / float(w), crop_h / float(h)]]) iou = multi_box_iou_xywh(crop_box, boxes) if min_iou <= iou.min() and max_iou >= iou.max(): crops.append((crop_x, crop_y, crop_w, crop_h)) break while crops: crop = crops.pop(np.random.randint(0, len(crops))) crop_boxes, crop_labels, box_num = box_crop(boxes, labels, crop, (w, h)) if box_num < 1: continue img = img.crop((crop[0], crop[1], crop[0] + crop[2], crop[1] + crop[3])).resize(img.size, Image.LANCZOS) img = np.asarray(img) return img, crop_boxes, crop_labels img = np.asarray(img) return img, boxes, labels登录后复制
--2、进行数据读取
In [12]#从xml文件下标注信息def get_Annotation(label_dict,xml_path): tree=ET.parse(xml_path)#读取xml文件 objs = tree.findall('object')#找到所有带有标签object的节点 im_w = float(tree.find('size').find('width').text)#text访问节点内容 im_h = float(tree.find('size').find('height').text) gt_bbox = np.zeros((len(objs), 4), dtype=np.float32) gt_class = np.zeros((len(objs), ), dtype=np.int32) for i,obj in enumerate(objs): classes_name = obj.find('name').text#标签名称 gt_class[i] = label_dict[classes_name] x1 = float(obj.find('bndbox').find('xmin').text) y1 = float(obj.find('bndbox').find('ymin').text) x2 = float(obj.find('bndbox').find('xmax').text) y2 = float(obj.find('bndbox').find('ymax').text) #保证坐标不超出图片范围 x1 = max(0, x1) y1 = max(0, y1) x2 = min(im_w - 1, x2) y2 = min(im_h - 1, y2) gt_bbox[i] = [(x1+x2)/2.0 , (y1+y2)/2.0, x2-x1+1., y2-y1+1.]#转化为xywh格式,注意这里算w,h要+1 #创建一个字典便于返回 if len(objs) != 0: voc_dict={ 'h': im_h, 'w': im_w, 'gt_class': gt_class, 'gt_bbox': gt_bbox} return voc_dicttest_xml='Annotations/road100.xml'record=get_Annotation(label_dict,test_xml)print(record)#从图片路径下读取图片信息#由于每张图片上真实框的数目不相同,处理起来会有一定困难,这里用get_bbox函数使每张图片真实框一致def get_bbox(gt_bbox, gt_class): # 对于一般的检测任务来说,一张图片上往往会有多个目标物体 # 设置参数MAX_NUM = 50, 即一张图片最多取50个真实框;如果真实 # 框的数目少于50个,则将不足部分的gt_bbox, gt_class和gt_score的各项数值全设置为0 MAX_NUM = 50 gt_bbox2 = np.zeros((MAX_NUM, 4)) gt_class2 = np.zeros((MAX_NUM,)) for i in range(len(gt_bbox)): gt_bbox2[i, :] = gt_bbox[i, :] gt_class2[i] = gt_class[i] if i >= MAX_NUM: break return gt_bbox2, gt_class2def get_img_data(record,img_file,mode): h = record['h'] w = record['w'] gt_labels = record['gt_class'] gt_boxes = record['gt_bbox'] #读取图片 img = cv2.imread(img_file) img = cv2.cvtColor(img, cv2.COLOR_BGR2RGB) #使真实框数目一致 if mode!='train': gt_boxes, gt_labels = get_bbox(gt_boxes, gt_labels) # gt_bbox 转变为相对值 gt_boxes[:, 0] = gt_boxes[:, 0] / float(w) gt_boxes[:, 1] = gt_boxes[:, 1] / float(h) gt_boxes[:, 2] = gt_boxes[:, 2] / float(w) gt_boxes[:, 3] = gt_boxes[:, 3] / float(h) if mode!='train': gt_score=np.ones(gt_labels.shape) return img, gt_boxes, gt_labels, (h, w),gt_score else: return img, gt_boxes, gt_labels, (h, w)test_img_file='JPEGImages/road159.png'img,gt_box,gt_label,scale,gt_score=get_img_data(record,test_img_file,mode='test')print(gt_box.shape,gt_label,scale)plt.figure()plt.imshow(img)plt.show()def mixup_image( img1, img2,gt_bbox1,gt_bbox2,gt_class1,gt_class2,alpha=1.5,beta=1.5): factor = np.random.beta(alpha,beta) factor = max(0.0, min(1.0, factor)) if factor >= 1.0: gt_bbox1,gt_class1=get_bbox(gt_bbox1,gt_class1) gt_score1 = np.ones_like(gt_class1) h=img1.shape[0] w=img1.shape[1] img1_shape=(h,w) return img1.astype('uint8'),gt_bbox1,gt_class1,gt_score1,img1_shape if factor <= 0.0: gt_bbox2,gt_class2=get_bbox(gt_bbox2,gt_class2) gt_score2 = np.ones_like(gt_class2) h=img2.shape[0] w=img2.shape[1] img2_shape=(h,w) return img2.astype('uint8'),gt_bbox2,gt_class2,gt_score2,img2_shape h = max(img1.shape[0], img2.shape[0]) w = max(img1.shape[1], img2.shape[1]) img_shape=(h,w) gt_bbox1[:, 0] = gt_bbox1[:, 0] * float(img1.shape[1])/float(w) gt_bbox1[:, 1] = gt_bbox1[:, 1] * float(img1.shape[0])/float(h) gt_bbox1[:, 2] = gt_bbox1[:, 2] * float(img1.shape[1])/float(w) gt_bbox1[:, 3] = gt_bbox1[:, 3] * float(img1.shape[0])/float(h) gt_bbox2[:, 0] = gt_bbox2[:, 0] * float(img1.shape[1])/float(w) gt_bbox2[:, 1] = gt_bbox2[:, 1] * float(img1.shape[0])/float(h) gt_bbox2[:, 2] = gt_bbox2[:, 2] * float(img1.shape[1])/float(w) gt_bbox2[:, 3] = gt_bbox2[:, 3] * float(img1.shape[0])/float(h) img = np.zeros((h, w, img1.shape[2]), 'float32') img[:img1.shape[0], :img1.shape[1], :] = img1.astype('float32') * factor img[:img2.shape[0], :img2.shape[1], :] += img2.astype('float32') * (1.0 - factor) gt_bbox = np.concatenate((gt_bbox1, gt_bbox2), axis=0) gt_class = np.concatenate((gt_class1, gt_class2), axis=0) gt_bbox,gt_class=get_bbox(gt_bbox,gt_class) gt_score1 = np.ones_like(gt_class1) gt_score2 = np.ones_like(gt_class2) #print(len(gt_score1)) #print(len(gt_score2)) gt_score_m = np.concatenate((gt_score1 * factor, gt_score2 * (1. - factor)), axis=0) gt_score = np.ones((50,)) for i in range(len(gt_score_m)): MAX_NUM=50 gt_score[i] = gt_score_m[i] if i >= MAX_NUM: break return img.astype('uint8'),gt_bbox,gt_class,gt_score,img_shape登录后复制
{'h': 385.0, 'w': 400.0, 'gt_class': array([1], dtype=int32), 'gt_bbox': array([[199. , 165.5, 329. , 322. ]], dtype=float32)}(50, 4) [1. 0. 0. 0. 0. 0. 0. 0. 0. 0. 0. 0. 0. 0. 0. 0. 0. 0. 0. 0. 0. 0. 0. 0. 0. 0. 0. 0. 0. 0. 0. 0. 0. 0. 0. 0. 0. 0. 0. 0. 0. 0. 0. 0. 0. 0. 0. 0. 0. 0.] (385.0, 400.0)登录后复制
/opt/conda/envs/python35-paddle120-env/lib/python3.7/site-packages/matplotlib/cbook/__init__.py:2349: DeprecationWarning: Using or importing the ABCs from 'collections' instead of from 'collections.abc' is deprecated, and in 3.8 it will stop working if isinstance(obj, collections.Iterator):/opt/conda/envs/python35-paddle120-env/lib/python3.7/site-packages/matplotlib/cbook/__init__.py:2366: DeprecationWarning: Using or importing the ABCs from 'collections' instead of from 'collections.abc' is deprecated, and in 3.8 it will stop working return list(data) if isinstance(data, collections.MappingView) else data登录后复制
<Figure size 432x288 with 1 Axes>登录后复制In [13]
#自定义数据集实现异步数据读取class Mydataset(Dataset): def __init__(self,mode='train'): super(Mydataset,self).__init__() self.mode=mode self.data_dir=[] #获取图片路径和标注信息路径 with open('{}_list.txt'.format(mode)) as f: for line in f.readlines(): info=line.strip().split(' ') if len(info)>0: self.data_dir.append([info[0].strip(),info[1].strip()]) #定义预处理方式 #print(self.data_dir[1][1]) if mode=='train': self.transforms=pt.Compose([ pt.Resize((416,416)), pt.ToTensor(),#转变成张量格式 pt.Normalize(mean=[0.485,0.456,0.406],std=[0.229,0.224,0.225]),#归一化 ]) else: self.transforms=pt.Compose([ pt.Resize((416,416)), pt.ToTensor(),#转变成张量格式 pt.Normalize(mean=[0.485,0.456,0.406],std=[0.229,0.224,0.225])#归一化 ]) def __getitem__(self,index): #对训练集多加几步预处理 if self.mode=='train': m=np.random.randint(0,703) img_file1,annotation_xml1=self.data_dir[index] img_file2,annotation_xml2=self.data_dir[m] record1=get_Annotation(label_dict,annotation_xml1) record2=get_Annotation(label_dict,annotation_xml2) img1,gt_box1,gt_label1,img_shape1=get_img_data(record1,img_file1,mode='train') img2,gt_box2,gt_label2,img_shape2=get_img_data(record2,img_file2,mode='train') img,gt_box,gt_label,gt_score,img_shape=mixup_image(img1,img2,gt_box1,gt_box2,gt_label1,gt_label2) #mixup操作 img=pt.adjust_contrast(img,contrast_factor=np.random.uniform(0.5, 1.5))#随机调整对比度 img=pt.adjust_brightness(img,brightness_factor=np.random.uniform(0.5, 1.5))#随机亮度调整 img=pt.adjust_hue(img,hue_factor=np.random.uniform(-0.4,0.4))#随机调整色调 img,gt_box=random_expand(img,gt_box)#随机填充 #img,gt_box,gt_label=random_crop(img,gt_box,gt_label)#随机裁剪 img,gt_box=random_flip(img,gt_box)#随机水平翻转 #img=random_interp(img,416)#随机缩放,这里是插值方式不同 img=self.transforms(img) else: img_file,annotation_xml=self.data_dir[index] record=get_Annotation(label_dict,annotation_xml) img,gt_box,gt_label,img_shape,gt_score=get_img_data(record,img_file,mode=self.mode) img=self.transforms(img) return img,gt_box,gt_label,np.array(img_shape),gt_score def __len__(self): return (len(self.data_dir))#创建实例:train_dataset=Mydataset(mode='train')valid_dataset=Mydataset(mode='val')test_dataset=Mydataset(mode='test')#看看第一条数据有没有问题print('训练集数目:{} 验证集数目:{} 测试集数目:{}'.format(len(train_dataset),len(valid_dataset),len(test_dataset)))print(valid_dataset[0][4])print('图片shape:{}n真实框shape:{}n标签:n{}n原图尺寸:{}n真实框得分:{}'.format(train_dataset[0][0].shape,train_dataset[0][1].shape,train_dataset[0][2],train_dataset[0][3],train_dataset[0][4]))登录后复制
训练集数目:703 验证集数目:87 测试集数目:87登录后复制
W0608 23:01:13.419925 177 device_context.cc:447] Please NOTE: device: 0, GPU Compute Capability: 7.0, Driver API Version: 11.2, Runtime API Version: 10.1W0608 23:01:13.424353 177 device_context.cc:465] device: 0, cuDNN Version: 7.6.登录后复制
[1. 1. 1. 1. 1. 1. 1. 1. 1. 1. 1. 1. 1. 1. 1. 1. 1. 1. 1. 1. 1. 1. 1. 1. 1. 1. 1. 1. 1. 1. 1. 1. 1. 1. 1. 1. 1. 1. 1. 1. 1. 1. 1. 1. 1. 1. 1. 1. 1. 1.]图片shape:[3, 416, 416]真实框shape:(50, 4)标签:[1. 1. 0. 0. 0. 0. 0. 0. 0. 0. 0. 0. 0. 0. 0. 0. 0. 0. 0. 0. 0. 0. 0. 0. 0. 0. 0. 0. 0. 0. 0. 0. 0. 0. 0. 0. 0. 0. 0. 0. 0. 0. 0. 0. 0. 0. 0. 0. 0. 0.]原图尺寸:[400 300]真实框得分:[0.29498365 0.70501635 1. 1. 1. 1. 1. 1. 1. 1. 1. 1. 1. 1. 1. 1. 1. 1. 1. 1. 1. 1. 1. 1. 1. 1. 1. 1. 1. 1. 1. 1. 1. 1. 1. 1. 1. 1. 1. 1. 1. 1. 1. 1. 1. 1. 1. 1. 1. 1. ]登录后复制
/opt/conda/envs/python35-paddle120-env/lib/python3.7/site-packages/paddle/tensor/creation.py:130: DeprecationWarning: `np.object` is a deprecated alias for the builtin `object`. To silence this warning, use `object` by itself. Doing this will not modify any behavior and is safe. Deprecated in NumPy 1.20; for more details and guidance: https://numpy.org/devdocs/release/1.20.0-notes.html#deprecations if data.dtype == np.object:登录后复制
二、kmeans,kmeans++聚类计算anchor
以下介绍了两种聚类,使用其中一种进行聚类即可
kmeans++聚类算法计算出anchor大小: [15, 15, 29, 23, 44, 34, 28, 62, 62, 46, 81, 64, 100, 99, 153, 160, 240, 310]
--1、使用kmeans聚类计算anchor:
第一步:首先我们要知道我们需要聚类的是bounding box,所以我们无需考虑其所属类别,第一步我们需要将所有的bounding box坐标提取出来,也许一张图有一个矩形框,也许有多个,但是我们需要无区别的将所有图片的所有矩形框提取出来,放在一起。
第二步:数据处理获得所有训练数据bounding boxes的宽高数据。给的训练数据往往是其bounding box的4个坐标,但是我们后续需要聚类分析的是bounding box的宽高大小,所以我们需要将坐标数据转换为框的宽高大小,计算方法很简单:长=右下角横坐标-左上角横坐标、宽=右下角纵坐标-左上角纵坐标。
第三步:初始化k个anchor box,通过在所有的bounding boxes中随机选取k个值作为k个anchor boxes的初始值。
第四步:计算每个bounding box与每个anchor box的iou值。传统的聚类方法是使用欧氏距离来衡量差异,也就是说如果我们运用传统的k-means聚类算法,可以直接聚类bounding box的宽和高,产生k个宽、高组合的anchor boxes,但是作者发现此方法在box尺寸比较大的时候,其误差也更大,所以作者引入了iou值,可以避免这个问题。由于iou值往往越大越好,所以作者定义了一个距离d参数,用来表示其误差: d=1-IOU
第五步:分类操作。经过前一步的计算可以的到每一个bounding box对于每个anchor box的误差d(n,k),我们通过比较每个bounding box其对于每个anchor box的误差大小{d(i,1),d(i,2),…,d(i,k)},选取最小误差的那个anchor box,将这个bounding box分类给它,对于每个bounding box都做这个操作,最后记录下来每个anchor box有哪些bounding box属于它。
第六步:anchor box更新。经过上一步,我们就知道每一个anchor box都有哪些bounding box属于它,然后对于每个anchor box中的那些bounding box,我们再求这些bounding box的宽高中值大小(也许也有使用平均值进行更新),将其作为该anchor box新的尺寸。
第七步:重复操作第四步到第六步,直到在第五步中发现对于全部bounding box其所属的anchor box类与之前所属的anchor box类完全一样。(这里表示所有bounding box的分类已经不再更新)
第八步:计算anchor boxes精确度。至第七步,其实已经通过k-means算法计算出anchor box。但是细心的同学可能已经发现,k-means.py还给出其精确度大小,其计算方法如下:使用最后得到的anchor boxes与每个bounding box计算其IOU值,对于每个bounding box选取其最高的那个IOU值(代表其属于某一个anchor box类),然后求所有bounding box该IOU值的平均值也即最后的精确度值。
In [14]#kmeans聚类#第一步先加载数据 读入每个gtbox的宽高,这里输出是相对值便于变换尺度def data_load(xml_path): dataset=[] for xml_file in glob.glob(”{}/*.xml“.format(xml_path)): tree=ET.parse(xml_file)#读取xml文件 objs = tree.findall('object')#找到所有带有标签object的节点 im_w = float(tree.find('size').find('width').text)#text访问节点内容 im_h = float(tree.find('size').find('height').text) for i,obj in enumerate(objs): x1 = float(obj.find('bndbox').find('xmin').text)/im_w y1 = float(obj.find('bndbox').find('ymin').text)/im_h x2 = float(obj.find('bndbox').find('xmax').text)/im_w y2 = float(obj.find('bndbox').find('ymax').text)/im_h dataset.append([x2-x1,y2-y1]) return np.array(dataset)#计算单个gtbox与所有的聚类中心的iou,只考虑大小,利用了广播机制def iou(box, clusters): ”“” Calculates the Intersection over Union (IoU) between a box and k clusters. :param box: tuple or array, shifted to the origin (i. e. width and height) :param clusters: numpy array of shape (k, 2) where k is the number of clusters :return: numpy array of shape (k, 0) where k is the number of clusters “”“ x = np.minimum(clusters[:, 0], box[0]) y = np.minimum(clusters[:, 1], box[1]) #np.count_nonzero是用于统计数组中非零元素的个数 if np.count_nonzero(x == 0) > 0 or np.count_nonzero(y == 0) > 0: raise ValueError(”Box has no area“) intersection = x * y box_area = box[0] * box[1] cluster_area = clusters[:, 0] * clusters[:, 1] iou_ = intersection / (box_area + cluster_area - intersection) return iou_ #选出所有每个gtbox与所有聚类中心的最大iou(距离最小)求均值def avg_iou(boxes, clusters): ”“” Calculates the average Intersection over Union (IoU) between a numpy array of boxes and k clusters. :param boxes: numpy array of shape (r, 2), where r is the number of rows :param clusters: numpy array of shape (k, 2) where k is the number of clusters :return: average IoU as a single float “”“ return np.mean([np.max(iou(boxes[i], clusters)) for i in range(boxes.shape[0])])#转换一下gtbox,xyxy-->w,h,没啥用def translate_boxes(boxes): ”“” Translates all the boxes to the origin. :param boxes: numpy array of shape (r, 4) :return: numpy array of shape (r, 2) “”“ new_boxes = boxes.copy() for row in range(new_boxes.shape[0]): new_boxes[row][2] = np.abs(new_boxes[row][2] - new_boxes[row][0]) new_boxes[row][3] = np.abs(new_boxes[row][3] - new_boxes[row][1]) return np.delete(new_boxes, [0, 1], axis=1)#进行聚类中心anchor的更新,dist有的也取均值np.meandef kmeans(boxes, k, dist=np.median): ”“” Calculates k-means clustering with the Intersection over Union (IoU) metric. :param boxes: numpy array of shape (r, 2), where r is the number of rows :param k: number of clusters :param dist: distance function :return: numpy array of shape (k, 2) “”“ rows = boxes.shape[0] # 取出一共有多少框 distances = np.empty((rows, k)) # 每个框各个点的位置,统计每个gtbox和当前聚类中心的距离 last_clusters = np.zeros((rows,)) # 最后的聚类位置 #里面有数字,种子才起作用 np.random.seed() # 初始化k个聚类中心(从原始数据集中随机选择k个) clusters = boxes[np.random.choice(rows, k, replace=False)] cnt = 0 t1 = time.time() while True: for row in range(rows): distances[row] = 1 - iou(boxes[row], clusters) nearest_clusters = np.argmin(distances, axis=1)#(r,1) #当最近距离不变时跳出 if (last_clusters == nearest_clusters).all(): break #分簇并对每一簇框的大小求中位数(也有求均值的)更新聚类中心 for cluster in range(k): clusters[cluster] = dist(boxes[nearest_clusters == cluster], axis=0) last_clusters = nearest_clusters #统计计算次数 cnt +=1 print('calculate times: %d'%cnt, end='r') #统计计算时间 run_time = time.time()-t1 return clusters, run_time登录后复制In [15]
ANNOTATIONS_PATH = ”/home/aistudio/Annotations“CLUSTERS = 9num = 10data = data_load(ANNOTATIONS_PATH)a = int(len(data))print('dataset anchor num: %d'%a)# 用于计算anchor平均大小anchor_sum = np.ones((CLUSTERS, 2))*0# 用于计算平均accacc_sum = 0 # 迭代多次,求平均值更有效for i in range(1,int(num)+1): out,t = kmeans(data, k=CLUSTERS) acc = avg_iou(data, out) out = sorted(out, key=(lambda x: x[0])) anchor_sum += out acc_sum += acc print('n%d th calculate done! cost time: %.2fs Accuracy:%.2f%%'%(i, t,(acc*100))) # 平均大小out = anchor_sum / int(num)acc = (acc_sum / int(num))#相对值print('nRaw ouput:')print(out)print('Anchors:')print(np.around(sorted(out*416, key=(lambda x: x[1]*x[0])))) #np.around用于取整,lambda是关键字匿名函数,面积排序print(”Average accuracy: %.2f%%“%(acc*100))#宽高比ratios = np.around(out[:, 0] / out[:, 1], decimals=2).tolist()print(”Ratios:n {}“.format(sorted(ratios)))登录后复制
dataset anchor num: 1244calculate times: 221 th calculate done! cost time: 0.63s Accuracy:76.47%calculate times: 222 th calculate done! cost time: 0.61s Accuracy:77.67%calculate times: 273 th calculate done! cost time: 0.74s Accuracy:76.13%calculate times: 114 th calculate done! cost time: 0.33s Accuracy:77.90%calculate times: 135 th calculate done! cost time: 0.43s Accuracy:77.68%calculate times: 146 th calculate done! cost time: 0.52s Accuracy:77.08%calculate times: 147 th calculate done! cost time: 0.52s Accuracy:77.63%calculate times: 88 th calculate done! cost time: 0.30s Accuracy:77.66%calculate times: 199 th calculate done! cost time: 0.72s Accuracy:77.30%calculate times: 1410 th calculate done! cost time: 0.54s Accuracy:77.33%Raw ouput:[[0.03566667 0.03582857] [0.063 0.05973502] [0.09027083 0.07975 ] [0.11881461 0.139375 ] [0.14075078 0.13975 ] [0.17766667 0.154 ] [0.23200251 0.20633472] [0.30707214 0.2695 ] [0.50435106 0.6575772 ]]Anchors:[[ 15. 15.] [ 26. 25.] [ 38. 33.] [ 49. 58.] [ 59. 58.] [ 74. 64.] [ 97. 86.] [128. 112.] [210. 274.]]Average accuracy: 77.28%Ratios: [0.77, 0.85, 1.0, 1.01, 1.05, 1.12, 1.13, 1.14, 1.15]登录后复制
--2使用Kmeans++聚类算法:(初始化聚类中心anchor不同而已)
k-means++是选择初始种子点的一种算法,其基本思想是:初始的聚类中心之间的相互距离要尽可能的远。
方法如下:
1.从输入的数据点集合中随机选择一个点作为第一个聚类中心 2.对于数据集中的每一个点x,计算它与最近聚类中心(指已选择的聚类中心)的距离D(x) 3.选择一个新的数据点作为新的聚类中心,选择的原则是:D(x)较大的点,被选取作为聚类中心的概率较大 4.重复2和3直到k个聚类中心被选出来 5.利用这k个初始的聚类中心来运行标准的k-means算法
第2、3步选择新点的方法如下: a.对于每个点,我们都计算其和最近的一个“种子点”的距离D(x)并保存在一个数组里,然后把这些距离加起来得到Sum(D(x))。 b.然后,再取一个随机值,用权重的方式来取计算下一个“种子点”。这个算法的实现是,先用Sum(D(x))乘以随机值Random得到值r,然后用currSum += D(x),直到其currSum>r,此时的点就是下一个“种子点”
假设A、B、C、D的D(x)如上图所示,当算法取值Sum(D(x))*random时,该值会以较大的概率落入D(x)较大的区间内,所以对应的点会以较大的概率被选中作为新的聚类中心。
In [16]# 通过k-means ++ 算法获取YOLOv3需要的anchors的尺寸import numpy as np# 定义Box类,描述bounding box的坐标class Box(): def __init__(self, x, y, w, h): self.x = x self.y = y self.w = w self.h = h#获取信息def get_data(xml_path): dataset=[] for xml_file in glob.glob(”{}/*.xml“.format(xml_path)): tree=ET.parse(xml_file)#读取xml文件 objs = tree.findall('object')#找到所有带有标签object的节点 im_w = float(tree.find('size').find('width').text)#text访问节点内容 im_h = float(tree.find('size').find('height').text) for i,obj in enumerate(objs): x1 = float(obj.find('bndbox').find('xmin').text)/im_w y1 = float(obj.find('bndbox').find('ymin').text)/im_h x2 = float(obj.find('bndbox').find('xmax').text)/im_w y2 = float(obj.find('bndbox').find('ymax').text)/im_h dataset.append(Box(0,0,x2-x1,y2-y1)) return dataset# 计算两个box在某个轴上的重叠部分# x1是box1的中心在该轴上的坐标# len1是box1在该轴上的长度# x2是box2的中心在该轴上的坐标# len2是box2在该轴上的长度# 返回值是该轴上重叠的长度def overlap(x1, len1, x2, len2): len1_half = len1 / 2 len2_half = len2 / 2 left = max(x1 - len1_half, x2 - len2_half) right = min(x1 + len1_half, x2 + len2_half) return right - left# 计算box a 和box b 的交集面积# a和b都是Box类型实例# 返回值area是box a 和box b 的交集面积def box_intersection(a, b): w = overlap(a.x, a.w, b.x, b.w) h = overlap(a.y, a.h, b.y, b.h) if w < 0 or h < 0: return 0 area = w * h return area# 计算 box a 和 box b 的并集面积# a和b都是Box类型实例# 返回值u是box a 和box b 的并集面积def box_union(a, b): i = box_intersection(a, b) u = a.w * a.h + b.w * b.h - i return u# 计算 box a 和 box b 的 iou# a和b都是Box类型实例# 返回值是box a 和box b 的ioudef box_iou(a, b): return box_intersection(a, b) / box_union(a, b)# 使用k-means ++ 初始化 centroids,减少随机初始化的centroids对最终结果的影响# boxes是所有bounding boxes的Box对象列表# n_anchors是k-means的k值# 返回值centroids 是初始化的n_anchors个centroiddef init_centroids(boxes,n_anchors): centroids = [] boxes_num=len(boxes) #随机选择一个点作为第一个聚类中心 centroid_index = np.random.randint(0,len(boxes)) centroids.append(boxes[centroid_index]) #生成剩下k-1个点 for centroid_index in range(0,n_anchors-1): sum_distance = 0 distance_thresh = 0 distance_list = [] cur_sum = 0 #对于数据集中的每一个点x,计算它与最近聚类中心(指已选择的聚类中心)的距离D(x) for box in boxes: min_distance = 1 for centroid_i, centroid in enumerate(centroids): distance = (1 - box_iou(box, centroid)) if distance < min_distance: min_distance = distance sum_distance += min_distance distance_list.append(min_distance) #用Sum(D(x))乘以随机值Random得到值r distance_thresh = sum_distance*np.random.random() #currSum += D(x),直到其currSum>r,此时的点就是下一个“种子点” for i in range(0,boxes_num): cur_sum += distance_list[i] if cur_sum > distance_thresh: centroids.append(boxes[i]) break return centroids# 进行 k-means 计算新的centroids# boxes是所有bounding boxes的Box对象列表# n_anchors是k-means的k值# centroids是所有簇的中心# 返回值new_centroids 是计算出的新簇中心# 返回值groups是n_anchors个簇包含的boxes的列表# 返回值loss是所有box距离所属的最近的centroid的距离的和def do_kmeans(n_anchors, boxes, centroids): loss = 0 groups = [] new_centroids = [] for i in range(n_anchors): groups.append([]) new_centroids.append(Box(0, 0, 0, 0)) #计算每个bounding box与每个anchor box的距离,进行分簇操作 for box in boxes: min_distance = 1 group_index = 0 for centroid_index, centroid in enumerate(centroids): distance = (1 - box_iou(box, centroid)) if distance < min_distance: min_distance = distance group_index = centroid_index groups[group_index].append(box) loss += min_distance new_centroids[group_index].w += box.w new_centroids[group_index].h += box.h #对每个簇的box求平均获得新的聚类中心 for i in range(n_anchors): new_centroids[i].w /= len(groups[i]) new_centroids[i].h /= len(groups[i]) return new_centroids, groups, loss# 计算给定bounding boxes的n_anchors数量的centroids# label_path是训练集列表文件地址# n_anchors 是anchors的数量# loss_convergence是允许的loss的最小变化值# grid_size * grid_size 是栅格数量# iterations_num是最大迭代次数# plus = 1时启用k means ++ 初始化centroidsdef compute_centroids(label_path,n_anchors,loss_convergence,size,iterations_num,plus): boxes=get_data(label_path) if plus: print('.......开始使用keans++聚类算法初始化聚类中心.........') centroids = init_centroids(boxes, n_anchors) else: centroid_indices = np.random.choice(len(boxes), n_anchors) centroids = [] for centroid_index in centroid_indices: centroids.append(boxes[centroid_index]) print('.......初始化聚类中心完毕.........') #进行kmeans聚类 centroids, groups, old_loss = do_kmeans(n_anchors, boxes, centroids) iterations = 1 while (True): #更新聚类中心 centroids, groups, loss = do_kmeans(n_anchors, boxes, centroids) iterations = iterations + 1 print(' k-means次数: %d'%iterations, end='r') #print(”loss = %f“ % loss) #当距离几乎不变,或者达到了最大的迭代次数就跳出 if abs(old_loss - loss) < loss_convergence or iterations > iterations_num: break old_loss = loss #变换到输入网络尺寸 #for centroid in centroids: #print(int(centroid.w * size), int(centroid.h * size)) # print result out=[] print('经过了{}次k-means聚类得到锚框大小:n'.format(iterations)) for centroid in centroids: out.append([int(centroid.w * size), int(centroid.h * size)]) out=np.array(out) print(np.around(sorted(out, key=(lambda x: x[1]*x[0])))) label_path = ”Annotations“n_anchors = 9loss_convergence = 1e-6size = 416iterations_num = 100plus = 1compute_centroids(label_path,n_anchors,loss_convergence,size,iterations_num,plus)登录后复制
.......开始使用keans++聚类算法初始化聚类中心................初始化聚类中心完毕.........经过了34次k-means聚类得到锚框大小:[[ 16 15] [ 30 29] [ 47 36] [ 62 53] [ 88 67] [ 64 129] [119 92] [154 166] [242 311]]登录后复制
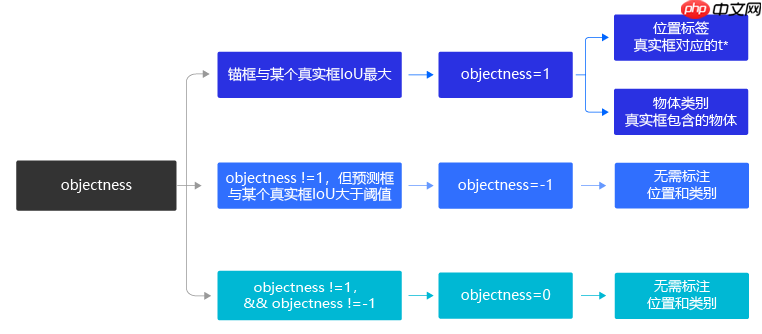
副本:yolov3原理实现算法:1、给锚框打标签
In [24]#这里写个计算IOU的函数,矩形框的输入形式为xywhdef box_iou_xywh(box1, box2): x1min, y1min = box1[0] - box1[2]/2.0, box1[1] - box1[3]/2.0 x1max, y1max = box1[0] + box1[2]/2.0, box1[1] + box1[3]/2.0 s1 = box1[2] * box1[3] x2min, y2min = box2[0] - box2[2]/2.0, box2[1] - box2[3]/2.0 x2max, y2max = box2[0] + box2[2]/2.0, box2[1] + box2[3]/2.0 s2 = box2[2] * box2[3] #计算并集面积 xmin = np.maximum(x1min, x2min) ymin = np.maximum(y1min, y2min) xmax = np.minimum(x1max, x2max) ymax = np.minimum(y1max, y2max) inter_h = np.maximum(ymax - ymin, 0.) inter_w = np.maximum(xmax - xmin, 0.) intersection = inter_h * inter_w union = s1 + s2 - intersection iou = intersection / union return iou #标注锚框具体程序:# 先标注预测框的objectnessdef get_objectness_label(img, gt_boxes, gt_labels, iou_threshold = 0.7,anchors = [ 100, 99, 153, 160, 240, 310],num_classes=4, downsample=32): img_shape = img.shape batchsize = img_shape[0] num_anchors = len(anchors) // 2 #k input_h = img_shape[2] input_w = img_shape[3] # 将输入图片划分成num_rows x num_cols个小方块区域,每个小方块的边长是 downsample # 计算一共有多少行小方块 num_rows = input_h // downsample #m # 计算一共有多少列小方块 num_cols = input_w // downsample #n label_objectness = np.zeros([batchsize, num_anchors, num_rows, num_cols])#[N,K,m,n] label_classification = np.zeros([batchsize, num_anchors, num_classes, num_rows, num_cols])#[N,K,C,m,n] label_location = np.zeros([batchsize, num_anchors, 4, num_rows, num_cols])#[N,K,4,m,n] #位置损失函数的加权因子,调整不同大小物体的权重 scale_location = np.ones([batchsize, num_anchors, num_rows, num_cols]) # 对batchsize进行循环,依次处理每张图片 for n in range(batchsize): # 对图片上的真实框进行循环,依次找出跟真实框形状最匹配的锚框 for n_gt in range(len(gt_boxes[n])): gt = gt_boxes[n][n_gt] gt_cls = gt_labels[n][n_gt] gt_center_x = gt[0] gt_center_y = gt[1] gt_width = gt[2] gt_height = gt[3] #对于之前补充为0的真实框直接跳过这种无效框 if (gt_width < 1e-3) or (gt_height < 1e-3): continue #找到真实框中心所属小方块区域,使用的相对值 i = int(gt_center_y * num_rows) j = int(gt_center_x * num_cols) #分别计算这个小方块内三个锚框与真实框的iou ious = [] for ka in range(num_anchors): #这里计算iou只需要考虑真实框和锚框的形状大小,不需要考虑中心点的位置 bbox1 = [0., 0., float(gt_width), float(gt_height)] anchor_w = anchors[ka * 2] anchor_h = anchors[ka * 2 + 1] #转化成相对值 bbox2 = [0., 0., anchor_w/float(input_w), anchor_h/float(input_h)] # 计算iou iou = box_iou_xywh(bbox1, bbox2) ious.append(iou) #找出IOU最大的锚框作为正样本 ious = np.array(ious) inds = np.argsort(ious)#返回索引值 k = inds[-1]#得到最大iou值的锚框 label_objectness[n, k, i, j] = 1 #这里正好转化成one-hot值 c = int(gt_cls) label_classification[n, k, c, i, j] = 1 # 计算位置标签 dx_label = gt_center_x * num_cols - j dy_label = gt_center_y * num_rows - i dw_label = np.log(gt_width * input_w / anchors[k*2]) dh_label = np.log(gt_height * input_h / anchors[k*2 + 1]) label_location[n, k, 0, i, j] = dx_label label_location[n, k, 1, i, j] = dy_label label_location[n, k, 2, i, j] = dw_label label_location[n, k, 3, i, j] = dh_label # scale_location用来调节不同尺寸的锚框对损失函数的贡献,作为加权系数和位置损失函数相乘 scale_location[n, k, i, j] = 2.0 - gt_width * gt_height # 目前根据每张图片上所有出现过的gt box,都标注出了objectness为正的预测框,剩下的预测框则默认objectness为0 # 对于objectness为1的预测框,标出了他们所包含的物体类别,以及位置回归的目标 return label_objectness.astype('float32'), label_location.astype('float32'), label_classification.astype('float32'),scale_location.astype('float32')登录后复制In [25]
#检验一下是否标注正确reader = paddle.io.DataLoader(train_dataset, batch_size=1, shuffle=True, drop_last=True)img, gt_boxes, gt_labels, im_shape,gt_score = next(reader())img= img.numpy()gt_boxes=gt_boxes.numpy()gt_labels=gt_labels.numpy()im_shape=im_shape.numpy()# 计算出锚框对应的标签label_objectness, label_location, label_classification, scale_location = get_objectness_label(img, gt_boxes, gt_labels, iou_threshold = 0.7, anchors = [ 100, 99, 153, 160, 240, 310], num_classes=4, downsample=32)print(img.shape, gt_boxes.shape, gt_labels.shape,im_shape,gt_score.shape)print(label_objectness.shape, label_location.shape, label_classification.shape, scale_location.shape)登录后复制
(1, 3, 416, 416) (1, 50, 4) (1, 50) [[400 400]] [1, 50](1, 3, 13, 13) (1, 3, 4, 13, 13) (1, 3, 4, 13, 13) (1, 3, 13, 13)登录后复制
三、网络模型部分
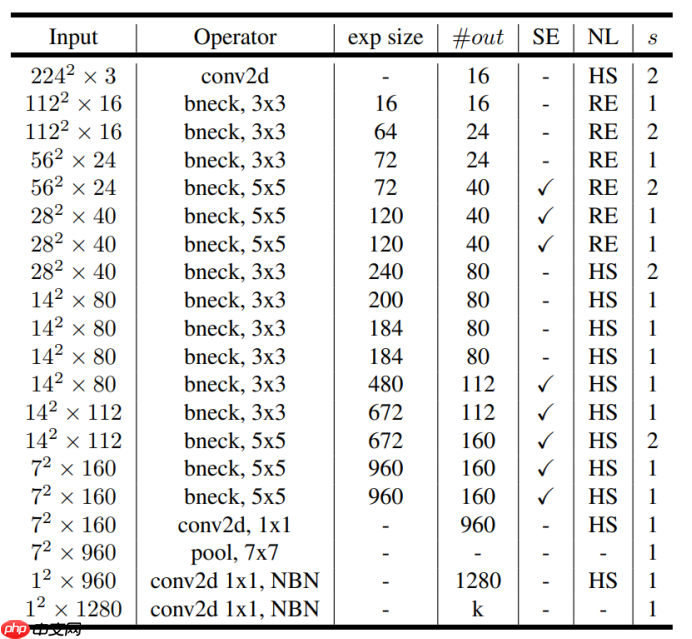
--1、特征提取backbone——MobileNetV3+CoordAtt
MobileNetV3_Large:
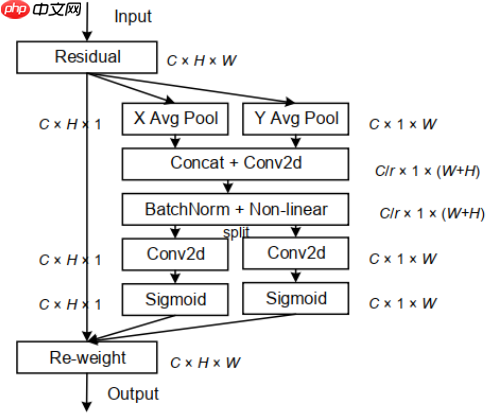
Coordinate Attention:新注意力机制,助力分类/检测/分割涨点!
In [?]#首先是Backbone部分,提取特征部分卷积神经网络#深度卷积DepthWise Convclass DW(nn.Layer): def __init__(self,in_dim,k,s): super(DW,self).__init__() self.DC=nn.Conv2D(in_channels=in_dim,out_channels=in_dim,kernel_size=k,stride=s,padding=(k-1)//2,groups=in_dim) def forward(self,inputs): x=self.DC(inputs) return x#逐点卷积Pointwise Convclass PW(nn.Layer): def __init__(self,in_dim,out_dim): super(PW,self).__init__() self.PC=nn.Conv2D(in_channels=in_dim,out_channels=out_dim,kernel_size=1,stride=1,padding=0,groups=1) def forward(self,inputs): x=self.PC(inputs) return x'''#定义ECA-Net,即插即用,替代mobilenetV3的注意力模块class ECANet(nn.Layer): def __init__(self,in_dim,gama=2,b=1): super(ECANet,self).__init__() self.avgpool=nn.AdaptiveAvgPool2D(output_size=1) t=int(abs((log(in_dim,2)+b)/gama)) #print(t) if t%2==0: k=t+1 else: k=t #print(k) self.conv=nn.Conv1D(in_channels=1,out_channels=1,kernel_size=k,stride=1,padding=int(k/2),groups=1,bias_attr=False) self.act=nn.Hardsigmoid() def forward(self,inputs): x=self.avgpool(inputs) x=paddle.squeeze(x,axis=-1) x=paddle.transpose(x,[0,2,1]) x=self.conv(x) x=paddle.transpose(x,[0,2,1]) x=paddle.unsqueeze(x,axis=-1) x=self.act(x) return inputs*x.expand_as(inputs)#expand_as作用是将输入tensor的维度扩展为与指定tensor相同的size,其实这里不加也可'''#定义Coordinate Attention,即插即用,替代mobilenetV3的注意力模块class CoordAtt(nn.Layer): def __init__(self,in_c,out_c,r=32): super(CoordAtt,self).__init__() self.pool_h=nn.AdaptiveAvgPool2D((None,1))#用尺寸为(H,1)大小的卷积核进行沿着水平坐标pooling到高度方向-->[N,C,H,1] self.pool_w=nn.AdaptiveAvgPool2D((1,None))#用尺寸为(1,W)大小的卷积核进行沿着垂直坐标pooling到宽度方向-->[N,C,1,W] mid_c = max(8, in_c // r)#保证最小通道数不小于8 self.conv=nn.Conv2D(in_channels=in_c,out_channels=mid_c,kernel_size=1,stride=1,padding=0)#用1*1卷积进行通道变换操作 self.bn=nn.BatchNorm2D(num_features=mid_c) self.act=nn.Hardswish() self.conv_h=nn.Conv2D(in_channels=mid_c,out_channels=out_c,kernel_size=1,stride=1,padding=0) self.conv_w=nn.Conv2D(in_channels=mid_c,out_channels=out_c,kernel_size=1,stride=1,padding=0) self.sigmoid=nn.Sigmoid() def forward(self,inputs): n,c,h,w=inputs.shape x_h=self.pool_h(inputs) x_mid_w=self.pool_w(inputs) #将宽度方向变换一下shape便于concat拼接 x_w=paddle.transpose(x_mid_w,[0,1,3,2]) x=paddle.concat([x_h,x_w],axis=2) x=self.conv(x) x=self.bn(x) x=self.act(x) #然后又进行spilt操作 x_h, x_w = paddle.split(x, [h, w], axis=2) x_w=paddle.transpose(x_w,[0,1,3,2]) out_h = self.sigmoid(self.conv_h(x_h)) out_w = self.sigmoid(self.conv_w(x_w)) return inputs*out_h*out_w #定义bneck块class bneck(nn.Layer): def __init__(self,in_dim,exp_dim,out_dim,k,s,act='RE',add_CA=True): super(bneck,self).__init__() self.pw1=PW(in_dim=in_dim,out_dim=exp_dim) self.pw1_bn=nn.BatchNorm2D(exp_dim) self.dw=DW(in_dim=exp_dim,k=k,s=s) self.dw_bn=nn.BatchNorm2D(exp_dim) self.ca=CoordAtt(in_c=exp_dim,out_c=exp_dim) self.pw2=PW(in_dim=exp_dim,out_dim=out_dim) self.pw2_bn=nn.BatchNorm2D(out_dim) if act=='RE': self.act=nn.ReLU() elif act=='HS': self.act=nn.Hardswish() self.add_ca=add_CA def forward(self,inputs): x=self.pw1(inputs) x=self.pw1_bn(x) x=self.act(x) x=self.dw(x) x=self.dw_bn(x) x=self.act(x) if self.add_ca: x=self.ca(x) x=self.pw2(x) out=self.pw2_bn(x) return out#定义第一个卷积层:class First_Conv(nn.Layer): def __init__(self,in_dim,out_dim,k,s,p): super(First_Conv,self).__init__() self.c0=nn.Conv2D(in_channels=in_dim,out_channels=out_dim,kernel_size=k,stride=s,padding=p) self.bn0=nn.BatchNorm2D(out_dim) self.act0=nn.Hardswish() def forward(self,inputs): x=self.c0(inputs) x=self.bn0(x) x=self.act0(x) return x#定义Backbone和Detection模块衔接部分class ConvBNLayer(nn.Layer): def __init__(self, ch_in, ch_out, kernel_size=1, stride=1, groups=1,padding=0, act=”leaky“): super(ConvBNLayer, self).__init__() self.conv = nn.Conv2D( in_channels=ch_in, out_channels=ch_out, kernel_size=kernel_size, stride=stride, padding=padding, groups=groups, weight_attr=paddle.ParamAttr( initializer=nn.initializer.Normal(0., 0.02)), bias_attr=False) self.batch_norm = nn.BatchNorm2D( num_features=ch_out, weight_attr=paddle.ParamAttr( initializer=nn.initializer.Normal(0., 0.02), regularizer=paddle.regularizer.L2Decay(0.)), bias_attr=paddle.ParamAttr( initializer=nn.initializer.Constant(0.0), regularizer=paddle.regularizer.L2Decay(0.))) self.act = act def forward(self, inputs): out = self.conv(inputs) out = self.batch_norm(out) if self.act == 'leaky': out = paddle.nn.functional.leaky_relu(x=out, negative_slope=0.1) return outclass MobileNetV3_large(nn.Layer): def __init__(self): super(MobileNetV3_large,self).__init__() self.Conv0=First_Conv(in_dim=3,out_dim=16,k=3,s=2,p=1) #in_dim,k,exp_dim,out_dim,add_CA,act,s set_list=[ [16,3,16,16,False,'RE',1], [16,3,64,24,False,'RE',2], [24,3,72,24,False,'RE',1], [24,5,72,40,True,'RE',2], [40,5,120,40,True,'RE',1], [40,5,120,40,True,'RE',1],#8倍下采样 [40,3,240,80,False,'HS',2], [80,3,200,80,False,'HS',1], [80,3,184,80,False,'HS',1], [80,3,184,80,False,'HS',1], [80,3,480,112,True,'HS',1], [112,3,672,112,True,'HS',1],#16倍下采样 [112,5,672,160,True,'HS',2], [160,5,960,160,True,'HS',1], [160,5,960,160,True,'HS',1]]#32倍下采样 layer_8=[] layer_16=[] layer_32=[] for i,set_config in enumerate(set_list): in_dim,k,exp_dim,out_dim,add_CA,act,s=set_config #print('{} {} {} {} {} {} {} {}'.format(i,in_dim,k,exp_dim,out_dim,add_CA,act,s)) if i<6: layer_8.append(bneck(in_dim=in_dim,exp_dim=exp_dim,out_dim=out_dim,k=k,s=s,act=act,add_CA=add_CA)) elif i>=6 and i<12: layer_16.append(bneck(in_dim=in_dim,exp_dim=exp_dim,out_dim=out_dim,k=k,s=s,act=act,add_CA=add_CA)) elif i>=12: layer_32.append(bneck(in_dim=in_dim,exp_dim=exp_dim,out_dim=out_dim,k=k,s=s,act=act,add_CA=add_CA)) self.Block_8=nn.Sequential(*layer_8) self.Block_16=nn.Sequential(*layer_16) self.Block_32=nn.Sequential(*layer_32) #调整一下通道数用于后面的多尺度检测 self.d8_to_256=ConvBNLayer(ch_in=40,ch_out=256) self.d16_to_512=ConvBNLayer(ch_in=112,ch_out=512) self.d32_to_512=ConvBNLayer(ch_in=160,ch_out=512) self.d32_to_1024=ConvBNLayer(ch_in=512,ch_out=1024) def forward(self,inputs): x=self.Conv0(inputs) out_1=self.Block_8(x) #升维度到256 out_1_to_256=self.d8_to_256(out_1) out_2=self.Block_16(out_1) out_2_to_512=self.d16_to_512(out_2) out_3=self.Block_32(out_2) out_3_to_512=self.d32_to_512(out_3) out_3_to_1024=self.d32_to_1024(out_3_to_512) return out_3_to_1024,out_2_to_512,out_1_to_256model=MobileNetV3_large()data=paddle.randn([1,3,416,416])d32_data,d16_data,d8_data=model(data)print(d32_data.shape,d16_data.shape,d8_data.shape)paddle.summary(model,(1,3,416,416))登录后复制
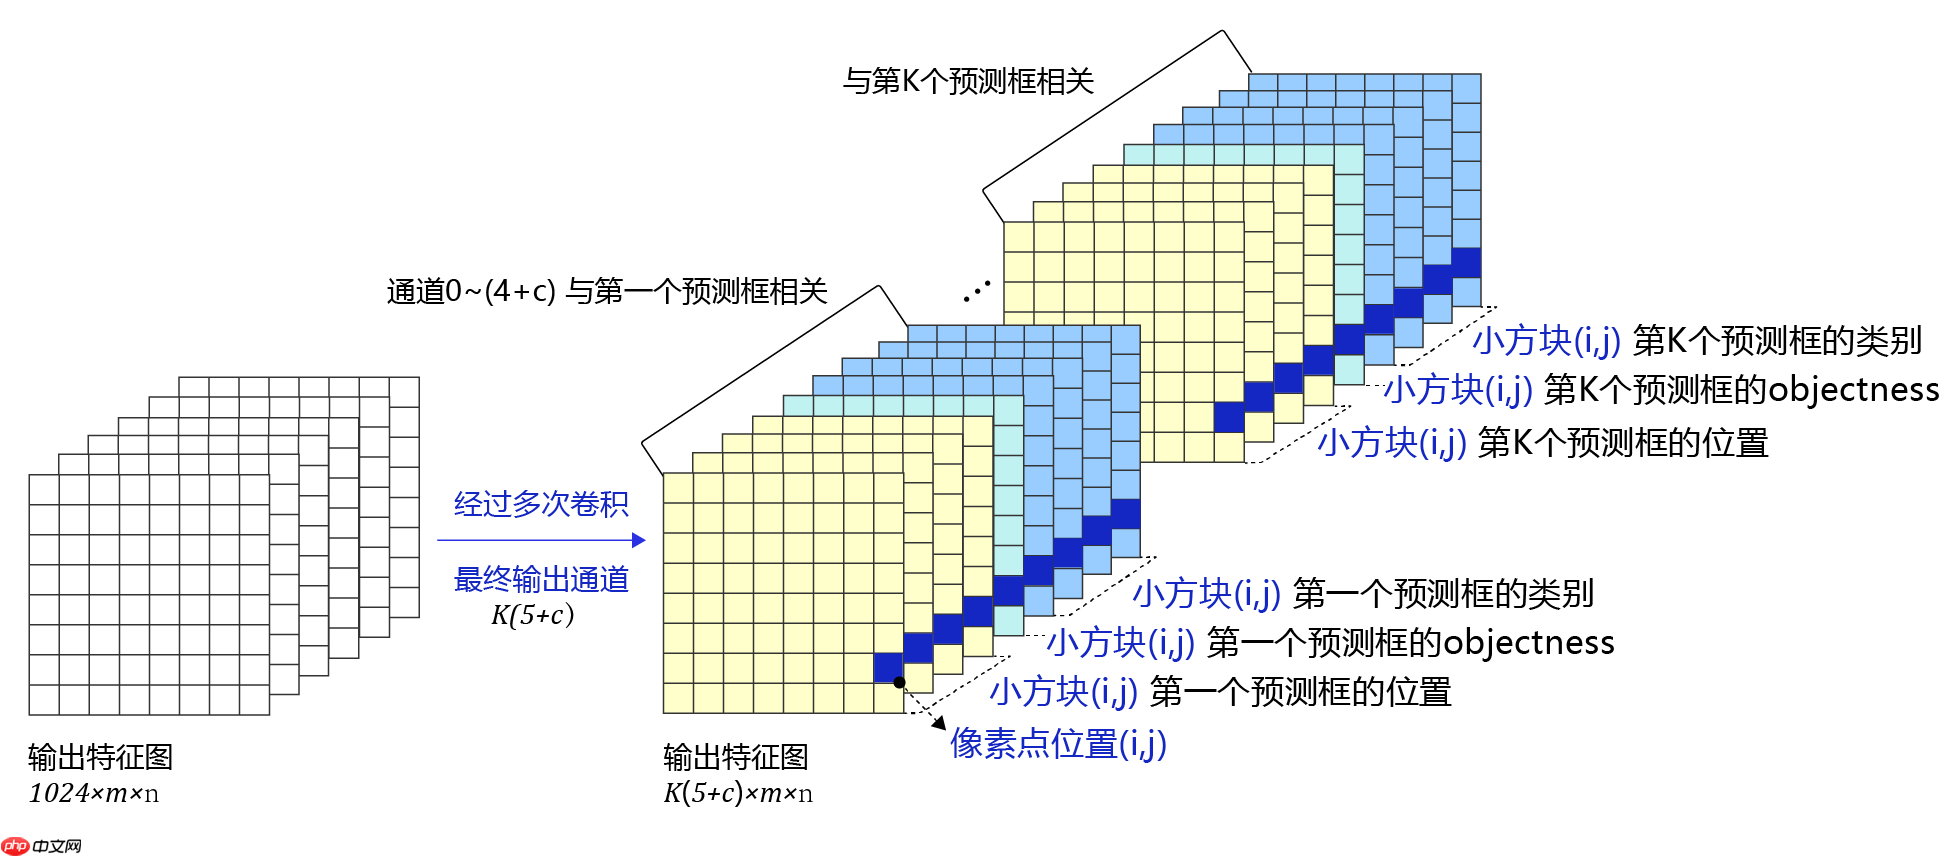
--2、检测Head——YoloDetectionBlock
对骨干网络的输出特征图进行多次卷积以得到跟预测框相关的特征图。 输出通道数需要为:Kx(5+C)
In [18]#定义一下检测blockclass YoloDetectionBlock(nn.Layer): # define YOLOv3 detection head # 使用多层卷积和BN提取特征 def __init__(self,ch_in,ch_out,is_test=True):#is_test是判断是否进行预测 super(YoloDetectionBlock, self).__init__() assert ch_out % 2 == 0, ”channel {} cannot be divided by 2“.format(ch_out) self.conv0 = ConvBNLayer(ch_in=ch_in,ch_out=ch_out,kernel_size=1,stride=1,padding=0) self.conv1 = ConvBNLayer(ch_in=ch_out,ch_out=ch_out*2,kernel_size=3,stride=1,padding=1) self.conv2 = ConvBNLayer(ch_in=ch_out*2,ch_out=ch_out,kernel_size=1,stride=1,padding=0) self.conv3 = ConvBNLayer(ch_in=ch_out,ch_out=ch_out*2,kernel_size=3,stride=1,padding=1) self.route = ConvBNLayer(ch_in=ch_out*2,ch_out=ch_out,kernel_size=1,stride=1,padding=0)#用于上采样 self.tip = ConvBNLayer(ch_in=ch_out,ch_out=ch_out*2,kernel_size=3,stride=1,padding=1)#用于预测输出 def forward(self, inputs): out = self.conv0(inputs) out = self.conv1(out) out = self.conv2(out) out = self.conv3(out) route = self.route(out) tip = self.tip(route) return route, tip#用32倍下采样检验一下NUM_ANCHORS = 3NUM_CLASSES = 4num_filters=NUM_ANCHORS * (NUM_CLASSES + 5)backbone = MobileNetV3_large()detection = YoloDetectionBlock(ch_in=1024, ch_out=512)conv2d_pred = paddle.nn.Conv2D(in_channels=1024, out_channels=num_filters, kernel_size=1)x=paddle.randn([1,3,416,416])C0,C1,C2= backbone(x)print(C0.shape)route, tip = detection(C0)P0 = conv2d_pred(tip)print(P0.shape)登录后复制
[1, 1024, 13, 13][1, 27, 13, 13]登录后复制
副本:yolov3原理实现算法:2、关联特征图和预测框
In [28]# 定义Sigmoid函数def sigmoid(x): return 1./(1.0 + np.exp(-x))# 将网络特征图输出的[tx, ty, th, tw]转化成预测框的坐标[x1, y1, x2, y2]def get_yolo_box_xxyy(pred, anchors, num_classes, downsample): ”“” pred是网络输出特征图转化成的numpy.ndarray anchors 是一个list。表示锚框的大小,例如 anchors = [116, 90, 156, 198, 373, 326],表示有三个锚框, 第一个锚框大小[w, h]是[116, 90],第二个锚框大小是[156, 198],第三个锚框大小是[373, 326] “”“ batchsize = pred.shape[0] num_rows = pred.shape[-2] num_cols = pred.shape[-1] input_h = num_rows * downsample input_w = num_cols * downsample num_anchors = len(anchors) // 2 # pred的形状是[N, C, H, W],其中C = NUM_ANCHORS * (5 + NUM_CLASSES) # 对pred进行reshape pred = pred.reshape([-1, num_anchors, 5+num_classes, num_rows, num_cols]) pred_location = pred[:, :, 0:4, :, :]#取出位置有关预测值tx,ty,tw,th pred_location = np.transpose(pred_location, (0,3,4,1,2))# #生成三个锚框的大小 anchors_this = [] for ind in range(num_anchors): anchors_this.append([anchors[ind*2], anchors[ind*2+1]]) anchors_this = np.array(anchors_this).astype('float32') # 最终输出数据保存在pred_box中,其形状是[N, H, W, NUM_ANCHORS, 4], # 其中最后一个维度4代表位置的4个坐标 #下面这几个循环可以看作是获取每个锚框的信息然后根据网络输出提取的预测信息生成对应的预测框 pred_box = np.zeros(pred_location.shape) #每张图片 for n in range(batchsize): #每个小方块 for i in range(num_rows): for j in range(num_cols): #每个小方块对应锚框 for k in range(num_anchors): #下面四个数值用来计算预测框 pred_box[n, i, j, k, 0] = j#cx pred_box[n, i, j, k, 1] = i#cy pred_box[n, i, j, k, 2] = anchors_this[k][0]#Ph pred_box[n, i, j, k, 3] = anchors_this[k][1]#Pw # 这里使用相对坐标,pred_box的输出元素数值在0.~1.0之间 pred_box[:, :, :, :, 0] = (sigmoid(pred_location[:, :, :, :, 0]) + pred_box[:, :, :, :, 0]) / num_cols #bx=cx+σ(tx) pred_box[:, :, :, :, 1] = (sigmoid(pred_location[:, :, :, :, 1]) + pred_box[:, :, :, :, 1]) / num_rows #by=cy+σ(ty) pred_box[:, :, :, :, 2] = np.exp(pred_location[:, :, :, :, 2]) * pred_box[:, :, :, :, 2] / input_w #bh=ph exp(th) pred_box[:, :, :, :, 3] = np.exp(pred_location[:, :, :, :, 3]) * pred_box[:, :, :, :, 3] / input_h #bw=pw exp(tw) # 将坐标从xywh转化成xyxy pred_box[:, :, :, :, 0] = pred_box[:, :, :, :, 0] - pred_box[:, :, :, :, 2] / 2. pred_box[:, :, :, :, 1] = pred_box[:, :, :, :, 1] - pred_box[:, :, :, :, 3] / 2. pred_box[:, :, :, :, 2] = pred_box[:, :, :, :, 0] + pred_box[:, :, :, :, 2] pred_box[:, :, :, :, 3] = pred_box[:, :, :, :, 1] + pred_box[:, :, :, :, 3] pred_box = np.clip(pred_box, 0., 1.0)#限定在0~1之间 return pred_box#检验一下上面函数是否正确,并提取预测信息检验形状NUM_ANCHORS = 3NUM_CLASSES = 4num_filters=NUM_ANCHORS * (NUM_CLASSES + 5)backbone = MobileNetV3_large()detection = YoloDetectionBlock(ch_in=1024, ch_out=512)conv2d_pred = paddle.nn.Conv2D(in_channels=1024, out_channels=num_filters, kernel_size=1)x=paddle.randn([1,3,416,416])C0, C1, C2 = backbone(x)route, tip = detection(C0)P0 = conv2d_pred(tip)#提取检测出的信息reshaped_p0 = paddle.reshape(P0, [-1, NUM_ANCHORS, NUM_CLASSES + 5, P0.shape[2], P0.shape[3]])pred_objectness = reshaped_p0[:, :, 4, :, :]pred_objectness_probability = nn.functional.sigmoid(pred_objectness)pred_location = reshaped_p0[:, :, 0:4, :, :]# anchors包含了预先设定好的锚框尺寸anchors = [ 100, 99, 153, 160, 240, 310]pred_boxes = get_yolo_box_xxyy(P0.numpy(), anchors, num_classes=4, downsample=32) # 由输出特征图P0计算预测框位置坐标#获取具体类别分类信息pred_classification = reshaped_p0[:, :, 5:5+NUM_CLASSES, :, :]pred_classification_probability = nn.functional.sigmoid(pred_classification)print(pred_objectness_probability.shape)print(pred_location.shape)print(pred_boxes.shape)#[N,H,W,num_anchors,4]print(pred_classification.shape)登录后复制
[1, 3, 13, 13][1, 3, 4, 13, 13](1, 13, 13, 3, 4)[1, 3, 4, 13, 13]登录后复制
副本:yolov3原理实现算法:3、损失函数建立
In [12]#预测值有了,之前标注的三种标签信息也有,并且也将其尺寸大小统一成一样了,接下来就开始建立损失函数# 挑选出跟真实框IoU大于阈值的预测框def get_iou_above_thresh_inds(pred_box, gt_boxes, iou_threshold): batchsize = pred_box.shape[0] num_rows = pred_box.shape[1] num_cols = pred_box.shape[2] num_anchors = pred_box.shape[3] ret_inds = np.zeros([batchsize, num_rows, num_cols, num_anchors]) #对每张图片做循环 for i in range(batchsize): pred_box_i = pred_box[i] gt_boxes_i = gt_boxes[i] #每个真实框 for k in range(len(gt_boxes_i)): #gt in gt_boxes_i: #转换成xyxy gt = gt_boxes_i[k] gtx_min = gt[0] - gt[2] / 2. gty_min = gt[1] - gt[3] / 2. gtx_max = gt[0] + gt[2] / 2. gty_max = gt[1] + gt[3] / 2. #跳过之前填充的无效真实框 if (gtx_max - gtx_min < 1e-3) or (gty_max - gty_min < 1e-3): continue #下面是利用numpy的矩阵操作一次性实现对所有预测框计算iou x1 = np.maximum(pred_box_i[:, :, :, 0], gtx_min) y1 = np.maximum(pred_box_i[:, :, :, 1], gty_min) x2 = np.minimum(pred_box_i[:, :, :, 2], gtx_max) y2 = np.minimum(pred_box_i[:, :, :, 3], gty_max) intersection = np.maximum(x2 - x1, 0.) * np.maximum(y2 - y1, 0.) s1 = (gty_max - gty_min) * (gtx_max - gtx_min) s2 = (pred_box_i[:, :, :, 2] - pred_box_i[:, :, :, 0]) * (pred_box_i[:, :, :, 3] - pred_box_i[:, :, :, 1]) union = s2 + s1 - intersection iou = intersection / union #找出大于阈值的预测框 above_inds = np.where(iou > iou_threshold)#返回大于阈值的索引位置,应该是个三维数组 ret_inds[i][above_inds] = 1 #[N,H,W,K] ret_inds = np.transpose(ret_inds, (0,3,1,2))#[N,K,H,W] return ret_inds.astype('bool')#超过阈值的设置为True#标注不计入损失的预测框为-1def label_objectness_ignore(label_objectness, iou_above_thresh_indices): # 注意:这里不能简单的使用 label_objectness[iou_above_thresh_indices] = -1, # 这样可能会造成label_objectness为1的点被设置为-1了 # 只有将那些被标注为0,且与真实框IoU超过阈值的预测框才被标注为-1 negative_indices = (label_objectness < 0.5) #对label_objectness中每个预测框标注的objectness和0.5进行比较返回bool类型值,之前标注为1的返回False ignore_indices = negative_indices * iou_above_thresh_indices label_objectness[ignore_indices] = -1 return label_objectnessdef get_loss(output, label_objectness, label_location, label_classification, scales, num_anchors=3, num_classes=4): #这里的output是p0 # 将output从[N, C, H, W]变形为[N, NUM_ANCHORS, NUM_CLASSES + 5, H, W] reshaped_output = paddle.reshape(output, [-1, num_anchors, num_classes + 5, output.shape[2], output.shape[3]]) # 从output中取出跟objectness相关的预测值 pred_objectness = reshaped_output[:, :, 4, :, :] loss_objectness = nn.functional.binary_cross_entropy_with_logits(pred_objectness, label_objectness, reduction=”none“)#binary_cross_entropy_with_logits函数内结合了sigmoid操作 # pos_samples 只有在正样本的地方取值为1.,其它地方取值全为0. pos_objectness = label_objectness > 0 pos_samples = paddle.cast(pos_objectness, 'float32')#转换张量数据类型 pos_samples.stop_gradient=True #这个操作使得pos_samples内的数值不进行计算梯度 # 从output中取出所有跟位置相关的预测值 tx = reshaped_output[:, :, 0, :, :] ty = reshaped_output[:, :, 1, :, :] tw = reshaped_output[:, :, 2, :, :] th = reshaped_output[:, :, 3, :, :] # 从label_location中取出各个位置坐标的标签 dx_label = label_location[:, :, 0, :, :] dy_label = label_location[:, :, 1, :, :] tw_label = label_location[:, :, 2, :, :] th_label = label_location[:, :, 3, :, :] # 构建损失函数 loss_location_x = nn.functional.binary_cross_entropy_with_logits(tx, dx_label, reduction=”none“)#reduction=”none“不对样本批次loss求均值,返回原始loss loss_location_y = nn.functional.binary_cross_entropy_with_logits(ty, dy_label, reduction=”none“) loss_location_w = paddle.abs(tw - tw_label) loss_location_h = paddle.abs(th - th_label) # 计算总的位置损失函数 loss_location = loss_location_x + loss_location_y + loss_location_h + loss_location_w # 乘以scales,scales是加权系数,增加小样本的位置损失的权重,提高小样本对损失的贡献作用 loss_location = loss_location * scales # 只计算正样本标注为1的位置损失函数 loss_location = loss_location * pos_samples # 从output取出所有跟物体类别相关的像素点 pred_classification = reshaped_output[:, :, 5:5+num_classes, :, :] # 计算分类相关的损失函数,注意这里是二分类损失计算,每个类别是独立的概率以及损失 loss_classification = nn.functional.binary_cross_entropy_with_logits(pred_classification, label_classification, reduction=”none“) # 将第2维求和,即对所有类别的损失求和 loss_classification = paddle.sum(loss_classification, axis=2) # 只计算objectness为正的样本的分类损失函数 loss_classification = loss_classification * pos_samples total_loss = loss_objectness + loss_location + loss_classification # 对所有预测框的loss进行求和,即对每张图片内 total_loss = paddle.sum(total_loss, axis=[1,2,3]) # 对所有样本求平均,在bacthsize维度求损失均值 total_loss = paddle.mean(total_loss) return total_lossfrom paddle.nn import Conv2D#下面实现一下对P0(32倍下采样)的预测的损失建立# 读取数据reader = paddle.io.DataLoader(train_dataset, batch_size=1, shuffle=True, num_workers=0, drop_last=True)img, gt_boxes, gt_labels, im_shape = next(reader())img, gt_boxes, gt_labels, im_shape = img.numpy(), gt_boxes.numpy(), gt_labels.numpy(), im_shape.numpy()# 计算出锚框对应的标签label_objectness, label_location, label_classification, scale_location = get_objectness_label(img, gt_boxes, gt_labels, iou_threshold = 0.7, anchors = [ 100, 99, 153, 160, 240, 310], num_classes=4, downsample=32) NUM_ANCHORS = 3NUM_CLASSES = 4num_filters=NUM_ANCHORS * (NUM_CLASSES + 5)backbone = MobileNetV3_large()detection = YoloDetectionBlock(ch_in=1024, ch_out=512)conv2d_pred = nn.Conv2D(in_channels=1024, out_channels=num_filters, kernel_size=1)x = paddle.to_tensor(img)C0,C1,C2 = backbone(x)route, tip = detection(C0)P0 = conv2d_pred(tip)# anchors包含了预先设定好的锚框尺寸anchors = [ 100, 99, 153, 160, 240, 310]# downsample是特征图P0的步幅pred_boxes = get_yolo_box_xxyy(P0.numpy(), anchors, num_classes=4, downsample=32)iou_above_thresh_indices = get_iou_above_thresh_inds(pred_boxes, gt_boxes, iou_threshold=0.7)label_objectness = label_objectness_ignore(label_objectness, iou_above_thresh_indices)label_objectness = paddle.to_tensor(label_objectness)label_location = paddle.to_tensor(label_location)label_classification = paddle.to_tensor(label_classification)scales = paddle.to_tensor(scale_location)#标签都不进行梯度计算label_objectness.stop_gradient=Truelabel_location.stop_gradient=Truelabel_classification.stop_gradient=Truescales.stop_gradient=Truetotal_loss = get_loss(P0, label_objectness, label_location, label_classification, scales, num_anchors=NUM_ANCHORS, num_classes=NUM_CLASSES)total_loss_data = total_loss.numpy()print(total_loss_data)登录后复制
[359.2131]登录后复制
--3、Architecture--YOlOV3组网多尺度检测
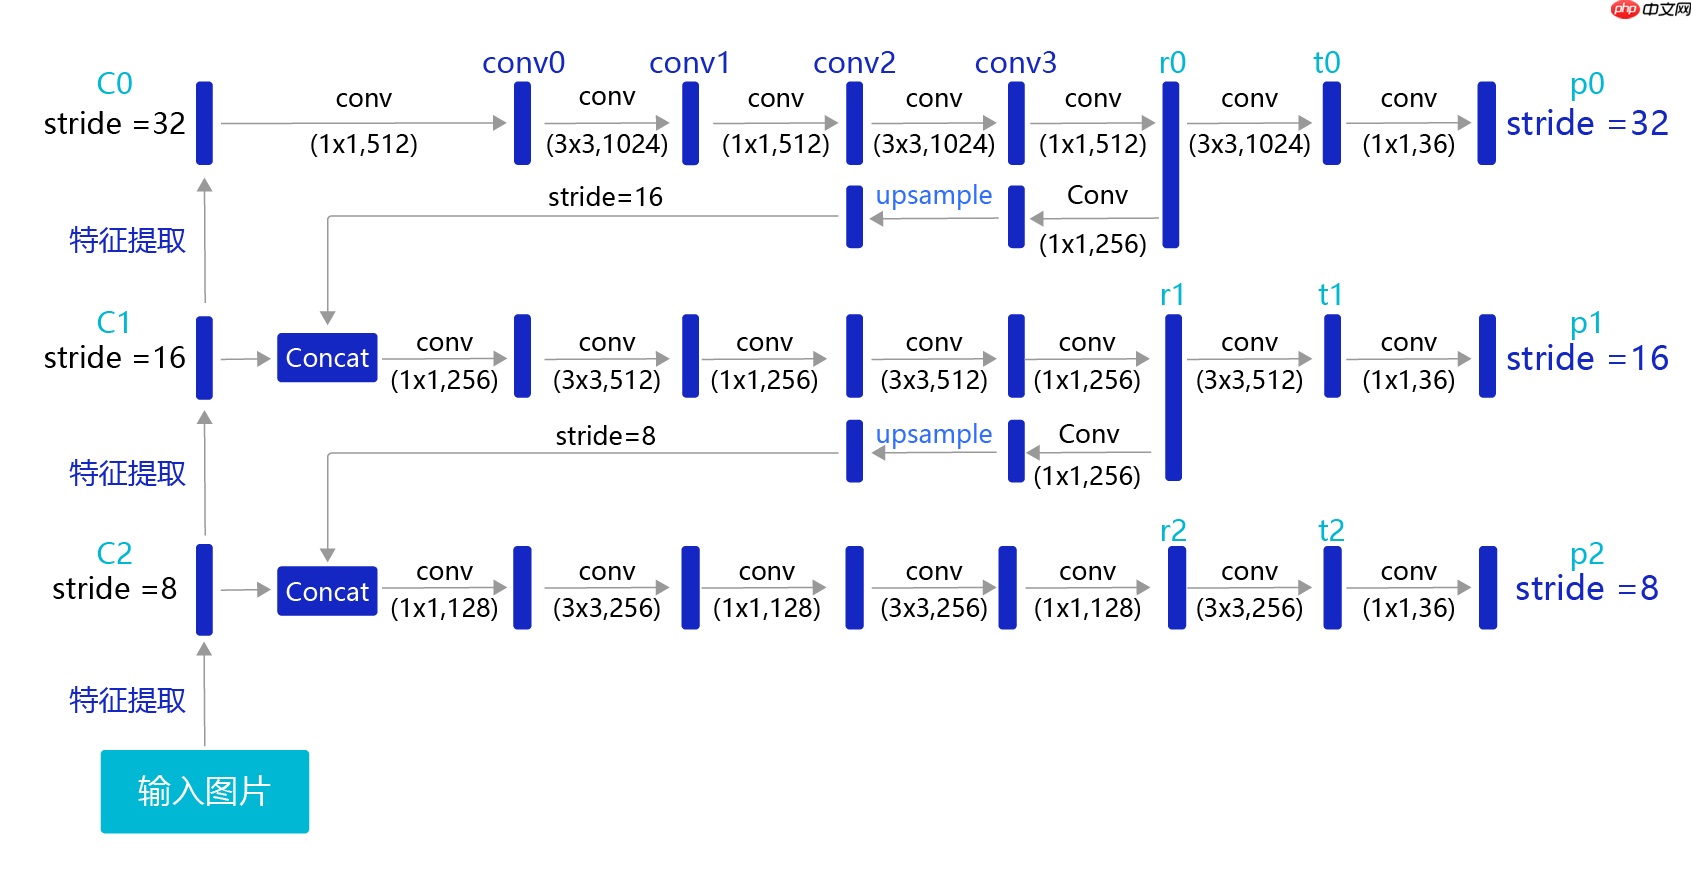
上面计算损失函数是在特征图P0的基础上进行的,它的步幅stride=32。特征图的尺寸比较小,像素点数目比较少,每个像素点的感受野很大,具有非常丰富的高层级语义信息,可能比较容易检测到较大的目标。为了能够检测到尺寸较小的那些目标,需要在尺寸较大的特征图上面建立预测输出。如果我们在C2或者C1这种层级的特征图上直接产生预测输出,可能面临新的问题,它们没有经过充分的特征提取,像素点包含的语义信息不够丰富,有可能难以提取到有效的特征模式。在目标检测中,解决这一问题的方式是,将高层级的特征图尺寸放大之后跟低层级的特征图进行融合,得到的新特征图既能包含丰富的语义信息,又具有较多的像素点,能够描述更加精细的结构。 注意backbone输出和YoloDetectionBlock之间还有个卷积用来升维的
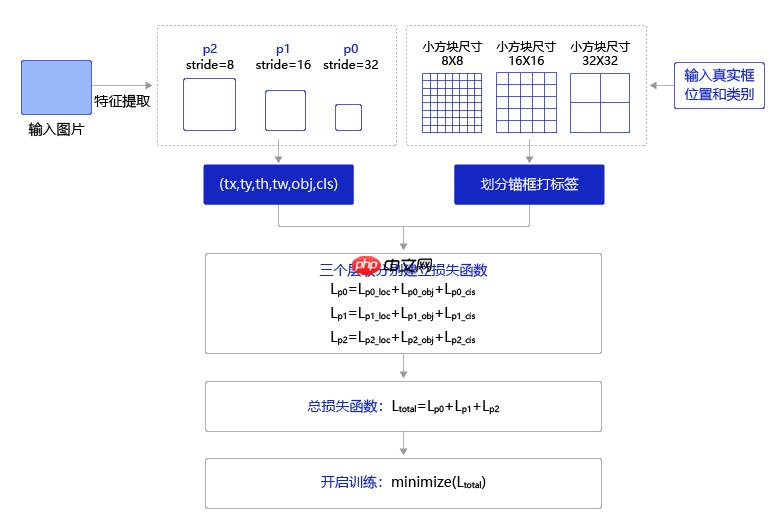
上述关联特征图和预测框损失函数的建立完全可以用paddle.vision.ops.yolo_loss进行代替,使用起来更加简便,因为有多尺度的检测,所以需要对上面的代码进行较大的修改,所以训练使用paddle.vision.ops.yolo_loss函数进行
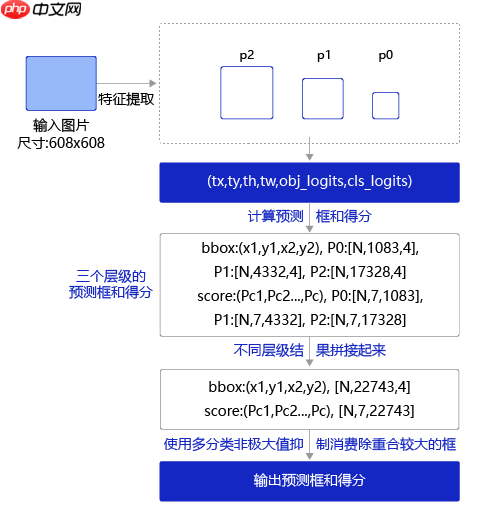
In [?]# 定义上采样模块class Upsample(paddle.nn.Layer): def __init__(self, scale=2): super(Upsample,self).__init__() self.scale = scale def forward(self, inputs): #获取特征图的shape shape_nchw = paddle.shape(inputs) #print(shape_nchw) #获取[h,w] shape_hw = paddle.slice(shape_nchw, axes=[0], starts=[2], ends=[4])#paddle.slice沿多个轴生成 input 的切片 #print(shape_hw) shape_hw.stop_gradient = True in_shape = paddle.cast(shape_hw, dtype='int32')#数据类型转换 out_shape = in_shape * self.scale #[2h,2w] #print(out_shape) out_shape.stop_gradient = True # 调整一个batch中图片(特征图)的大小 out = paddle.nn.functional.interpolate( x=inputs, scale_factor=self.scale, mode=”NEAREST“)#最近邻插值 return outclass YOLOv3(paddle.nn.Layer): def __init__(self, num_classes=4): super(YOLOv3,self).__init__() self.num_classes = num_classes # 提取图像特征的骨干代码-Backbone self.block = MobileNetV3_large() self.block_outputs = [] self.yolo_blocks = [] self.route_blocks_2 = [] # 生成3个层级的特征图P0, P1, P2 for i in range(3): # 添加从ci生成ri和ti的模块 #add_sublayer 向模型添加子层操作 yolo_block = self.add_sublayer(”yolo_detecton_block_%d“ % (i), YoloDetectionBlock(ch_in=512//(2**i)*2 if i==0 else 512//(2**i)*2 + 512//(2**i),ch_out = 512//(2**i))) self.yolo_blocks.append(yolo_block) num_filters = 3 * (self.num_classes + 5) # 添加从ti生成pi的模块,这是一个Conv2D操作,输出通道数为3 * (num_classes + 5) block_out = self.add_sublayer( ”block_out_%d“ % (i), paddle.nn.Conv2D(in_channels=512//(2**i)*2,out_channels=num_filters,kernel_size=1,stride=1,padding=0, weight_attr=paddle.ParamAttr(initializer=paddle.nn.initializer.Normal(0., 0.02)), bias_attr=paddle.ParamAttr(initializer=paddle.nn.initializer.Constant(0.0), regularizer=paddle.regularizer.L2Decay(0.)))) self.block_outputs.append(block_out) if i < 2: # 对ri进行卷积 route = self.add_sublayer(”route2_%d“%i,ConvBNLayer(ch_in=512//(2**i),ch_out=256//(2**i),kernel_size=1,stride=1,padding=0)) self.route_blocks_2.append(route) # 将ri放大以便跟c_{i+1}保持同样的尺寸 self.upsample = Upsample() def forward(self, inputs): outputs = [] #骨干网络输出的特征图三个维度C0(32),C1(16),C2(8) blocks= self.block(inputs) for i, block in enumerate(blocks): if i > 0: # 将r_{i-1}经过卷积和上采样之后得到特征图,与这一级的ci进行拼接 block = paddle.concat([route, block], axis=1) # 从ci生成ti和ri route, tip = self.yolo_blocks[i](block) # 从ti生成pi block_out = self.block_outputs[i](tip) # 将pi放入列表 outputs.append(block_out) if i < 2: # 对ri进行卷积调整通道数 route = self.route_blocks_2[i](route) # 对ri进行放大,使其尺寸和c_{i+1}保持一致 route = self.upsample(route) return outputs#P0层级特征图,对应着使用32×32大小的小方块,在每个区域中心生成大小分别为[116,90],[156,198],[373,326]的三种锚框。#P1层级特征图,对应着使用16×16大小的小方块,在每个区域中心生成大小分别为[30,61],[62,45],[59,119]的三种锚框。#P2层级特征图,对应着使用8×8大小的小方块,在每个区域中心生成大小分别为[10,13],[16,30],[33,23]的三种锚框 def get_loss_1(self, outputs, gtbox, gtlabel, gtscore=None, anchors = [15, 15, 29, 23, 44, 34, 28, 62, 62, 46, 81, 64, 100, 99, 153, 160, 240, 310], anchor_masks = [[6, 7, 8], [3, 4, 5], [0, 1, 2]], ignore_thresh=0.7, use_label_smooth=False): self.losses = [] downsample = 32 for i, out in enumerate(outputs): # 对三个层级分别求损失函数 anchor_mask_i = anchor_masks[i] loss = paddle.vision.ops.yolo_loss( x=out, # out是P0, P1, P2中的一个 gt_box=gtbox, # 真实框坐标 gt_label=gtlabel, # 真实框类别 gt_score=gtscore, # 真实框得分,使用mixup训练技巧时需要,不使用该技巧时直接设置为1,形状与gtlabel相同 anchors=anchors, # 锚框尺寸,包含[w0, h0, w1, h2, ..., w8, h8]共9个锚框的尺寸 anchor_mask=anchor_mask_i, # 筛选锚框的mask,例如anchor_mask_i=[3, 4, 5],将anchors中第3、4、5个锚框挑选出来给该层级使用 class_num=self.num_classes, # 分类类别数 ignore_thresh=ignore_thresh, # 当预测框与真实框IoU > ignore_thresh,标注objectness = -1 downsample_ratio=downsample, # 特征图相对于原图缩小的倍数,例如P0是32, P1是16,P2是8 use_label_smooth=False) # 使用label_smooth训练技巧时会用到,这里没用此技巧,直接设置为False self.losses.append(paddle.mean(loss)) #mean对每张图片求和 downsample = downsample // 2 # 下一级特征图的缩放倍数会减半 return sum(self.losses) # 对每个层级求和 def get_pred(self, outputs, im_shape=None, anchors = [15, 15, 29, 23, 44, 34, 28, 62, 62, 46, 81, 64, 100, 99, 153, 160, 240, 310], anchor_masks = [[6, 7, 8], [3, 4, 5], [0, 1, 2]], valid_thresh = 0.01): downsample = 32 total_boxes = [] total_scores = [] #对每个层级(P0,P1,P2)做循环 for i, out in enumerate(outputs): anchor_mask = anchor_masks[i] #选出该层级锚框大小 anchors_this_level = [] for m in anchor_mask: anchors_this_level.append(anchors[2 * m]) anchors_this_level.append(anchors[2 * m + 1]) #输出boxes:形为[N,M,4]的三维张量;scores:形为[N,M,class_num]的三维张量 boxes, scores = paddle.vision.ops.yolo_box( x=out, #网络输出特征图,P0、P1、P2。 img_size=im_shape, #输入图片尺寸 anchors=anchors_this_level, #使用到的anchor的尺寸,如[10, 13, 16, 30, 33, 23, 30, 61, 62, 45, 59, 119, 116, 90, 156, 198, 373, 326] class_num=self.num_classes, #物体类别数 conf_thresh=valid_thresh, #置信度阈值,得分低于该阈值的预测框位置数值不用计算直接设置为0.0。应该是objectness得分 downsample_ratio=downsample, #下采样倍率 name=”yolo_box“ + str(i)) #名称 total_boxes.append(boxes)#[3,N,M,4] total_scores.append( paddle.transpose( scores, perm=[0, 2, 1])) #[3,N,class_num,M] downsample = downsample // 2 #将不同层级的结果进行拼接,在预测框个数维度上进行拼接 yolo_boxes = paddle.concat(total_boxes, axis=1)#[N,M,4] yolo_scores = paddle.concat(total_scores, axis=2)#[N,class_num,M] return yolo_boxes, yolo_scoresmodel = YOLOv3(num_classes=NUM_CLASSES)paddle.summary(model,(1,3,416,416))登录后复制
四、端到端开始训练
In [?]import timeimport osimport paddleANCHORS = [15, 15, 29, 23, 44, 34, 28, 62, 62, 46, 81, 64, 100, 99, 153, 160, 240, 310]ANCHOR_MASKS = [[6, 7, 8], [3, 4, 5], [0, 1, 2]]IGNORE_THRESH = 0.7NUM_CLASSES = 4train_loader = paddle.io.DataLoader(train_dataset, batch_size=8, shuffle=True, num_workers=0, drop_last=True)valid_loader = paddle.io.DataLoader(valid_dataset, batch_size=8, shuffle=True, num_workers=0, drop_last=True)def train(model): use_gpu = True paddle.set_device('gpu:0') if use_gpu else paddle.set_device('cpu') print('..............train start.............') #这里需要自行调整学习率和训练轮数进行调参,大概跑了1000轮左右 lr = paddle.optimizer.lr.CosineAnnealingDecay(learning_rate=0.0005, T_max=100, verbose=True) opt = paddle.optimizer.Adam(learning_rate=lr, weight_decay=paddle.regularizer.L2Decay(0.0005), parameters=model.parameters()) MAX_EPOCH = 100 model.train() for epoch in range(MAX_EPOCH): for i, data in enumerate(train_loader()): img, gt_boxes, gt_labels, img_scale,gt_scores= data gt_scores=paddle.cast(gt_scores,'float32') img = paddle.to_tensor(img) img = paddle.cast(img,'float32') gt_boxes = paddle.to_tensor(gt_boxes) gt_boxes = paddle.cast(gt_boxes,'float32') gt_labels = paddle.to_tensor(gt_labels) gt_labels = paddle.cast(gt_labels,'int32') outputs = model(img) #前向传播,输出[P0, P1, P2] loss = model.get_loss_1(outputs, gt_boxes, gt_labels, gtscore=gt_scores, anchors = ANCHORS, anchor_masks = ANCHOR_MASKS, ignore_thresh=IGNORE_THRESH, use_label_smooth=False) loss.backward() opt.step() # 更新参数 opt.clear_grad() if i % 10 == 0: timestring = time.strftime(”%Y-%m-%d %H:%M:%S“,time.localtime(time.time())) #训练时刻 print('{}[TRAIN]epoch {}, iter {}, output loss: {}'.format(timestring, epoch, i, loss.numpy())) # 保存模型,需要自行调整保存路径和保存节点 if (epoch % 10 == 0) or (epoch == MAX_EPOCH -1): paddle.save(model.state_dict(), './900epochs_1/yolo_epoch{}.pdparams'.format(epoch)) paddle.save(opt.state_dict(),'./900epochs_1/yolo_epoch{}.pdopt'.format(epoch)) # 每个epoch结束之后在验证集上进行测试 model.eval() for i, data in enumerate(valid_loader()): img, gt_boxes, gt_labels, img_scale,gt_scores = data gt_scores=paddle.cast(gt_scores,'float32') img = paddle.to_tensor(img) img = paddle.cast(img,'float32') gt_boxes = paddle.to_tensor(gt_boxes) gt_boxes = paddle.cast(gt_boxes,'float32') gt_labels = paddle.to_tensor(gt_labels) gt_labels = paddle.cast(gt_labels,'int32') outputs = model(img) loss = model.get_loss_1(outputs, gt_boxes, gt_labels, gtscore=gt_scores, anchors = ANCHORS, anchor_masks = ANCHOR_MASKS, ignore_thresh=IGNORE_THRESH, use_label_smooth=False) '''loss.backward() opt.step() opt.clear_grad()''' if i % 1 == 0: timestring = time.strftime(”%Y-%m-%d %H:%M:%S“,time.localtime(time.time())) print('{}[VALID]epoch {}, iter {}, output loss: {}'.format(timestring, epoch, i, loss.numpy())) lr.step() #更新学习率 model.train()#这里可以把注释取消,进行恢复训练model = YOLOv3(num_classes = NUM_CLASSES) #创建模型#params_file_path = '800epochs_1/yolo_epoch640.pdparams'#param_dict = paddle.load(params_file_path)#model.set_state_dict(param_dict)train(model)print('Done')登录后复制
五、进行预测
--1、非极大值抑制
这里使用非极大值抑制(non-maximum suppression, nms)来消除冗余框。基本思想是,如果有多个预测框都对应同一个物体,则只选出得分最高的那个预测框,剩下的预测框被丢弃掉。
In [20]#计算IOU,输入形式为xyxydef box_iou_xyxy(box1, box2): # 获取box1左上角和右下角的坐标 x1min, y1min, x1max, y1max = box1[0], box1[1], box1[2], box1[3] # 计算box1的面积 s1 = (y1max - y1min + 1.) * (x1max - x1min + 1.) # 获取box2左上角和右下角的坐标 x2min, y2min, x2max, y2max = box2[0], box2[1], box2[2], box2[3] # 计算box2的面积 s2 = (y2max - y2min + 1.) * (x2max - x2min + 1.) # 计算相交矩形框的坐标 xmin = np.maximum(x1min, x2min) ymin = np.maximum(y1min, y2min) xmax = np.minimum(x1max, x2max) ymax = np.minimum(y1max, y2max) # 计算相交矩形行的高度、宽度、面积 inter_h = np.maximum(ymax - ymin + 1., 0.) inter_w = np.maximum(xmax - xmin + 1., 0.) intersection = inter_h * inter_w # 计算相并面积 union = s1 + s2 - intersection # 计算交并比 iou = intersection / union return iou# 非极大值抑制def nms(bboxes, scores, score_thresh, nms_thresh, pre_nms_topk, i=0, c=0): #对得分进行排序 inds = np.argsort(scores) #变成从高到低 inds = inds[::-1] inds=inds[:pre_nms_topk] keep_inds = [] while(len(inds) > 0): #取出得分最高的 cur_ind = inds[0] cur_score = scores[cur_ind] # 如果得分低于score_thresh就丢掉,直接跳出循环不进行得分低的筛选 if cur_score < score_thresh: break keep = True #对保留下的keep_inds做循环 for ind in keep_inds: #取出当前box和保留下的box计算iou current_box = bboxes[cur_ind] remain_box = bboxes[ind] iou = box_iou_xyxy(current_box, remain_box) #iou大于阈值的删除 if iou > nms_thresh: keep = False break if keep: keep_inds.append(cur_ind) inds = inds[1:] #删除剩余中的第一个box return np.array(keep_inds)# 多分类非极大值抑制,即对每个类别做nmsdef multiclass_nms(bboxes, scores, score_thresh=0.01, nms_thresh=0.45, pre_nms_topk=1000, pos_nms_topk=100): ''' pre_nms_topk=1000只考虑得分前1000的预测框,得分太低的不用考虑 pos_nms_topk=100如果经过nms后的box太多就只要前100个 ''' batch_size = bboxes.shape[0] class_num = scores.shape[1] #最终返回的结果 rets = [] #对每张图片 for i in range(batch_size): bboxes_i = bboxes[i] scores_i = scores[i] ret = [] #对每个类别 for c in range(class_num): scores_i_c = scores_i[c] keep_inds = nms(bboxes_i, scores_i_c, score_thresh, nms_thresh, pre_nms_topk, i=i, c=c) #如果该类别没有就直接跳过 if len(keep_inds) < 1: continue keep_bboxes = bboxes_i[keep_inds] keep_scores = scores_i_c[keep_inds] #保留结果格式(类别,得分,位置) keep_results = np.zeros([keep_scores.shape[0], 6]) keep_results[:, 0] = c keep_results[:, 1] = keep_scores[:] keep_results[:, 2:6] = keep_bboxes[:, :] ret.append(keep_results) #对于没有该类别的直接添加 if len(ret) < 1: rets.append(ret) continue #所有类别的结果拼接到一起 ret_i = np.concatenate(ret, axis=0) scores_i = ret_i[:, 1] #如果选出的box过多,则根据得分排序选出前pos_nms_topk个 if len(scores_i) > pos_nms_topk: inds = np.argsort(scores_i)[::-1] inds = inds[:pos_nms_topk] ret_i = ret_i[inds] rets.append(ret_i) return rets登录后复制
--2、评价指标mAP的实现
In [21]def get_total_box_label(data_path): data_dir=[] total_gt_box=[] total_gt_label=[] with open(data_path) as f: for line in f.readlines(): info=line.strip().split(' ') if len(info)>0: data_dir.append(info[1].strip()) for i,xml_file in enumerate(data_dir): tree=ET.parse(xml_file)#读取xml文件 objs = tree.findall('object')#找到所有带有标签object的节点 for i,obj in enumerate(objs): classes_name = obj.find('name').text#标签名称 x1 = float(obj.find('bndbox').find('xmin').text) y1 = float(obj.find('bndbox').find('ymin').text) x2 = float(obj.find('bndbox').find('xmax').text) y2 = float(obj.find('bndbox').find('ymax').text) total_gt_box.append([x1,y1,x2,y2]) total_gt_label.append(label_dict[classes_name]) return np.array(total_gt_box),np.array(total_gt_label)total_gt_box,total_gt_label=get_total_box_label('test_list.txt')print(total_gt_box.shape,total_gt_label.shape,total_gt_box[0],total_gt_label[0])def get_pre_score_box_label(total_results): total_pre_box=[] total_pre_label=[] total_pre_score=[] for i,result in enumerate(total_results): for j in range(len(total_results[i][1])): if(len(total_results[i][1])==0): break total_pre_box.append(total_results[i][1][j][2:]) total_pre_score.append(total_results[i][1][j][1]) total_pre_label.append(total_results[i][1][j][0]) return np.array(total_pre_box),np.array(total_pre_label),np.array(total_pre_score)登录后复制
(132, 4) (132,) [135. 174. 153. 191.] 1登录后复制In [22]
def mat_inter(box1, box2): ”“” 判断box1与box2代表的两个矩形是否相交 “”“ # 判断两个矩形是否相交 x01, y01, x02, y02 = box1 x11, y11, x12, y12 = box2 lx = abs((x01 + x02) / 2 - (x11 + x12) / 2) ly = abs((y01 + y02) / 2 - (y11 + y12) / 2) sax = abs(x01 - x02) sbx = abs(x11 - x12) say = abs(y01 - y02) sby = abs(y11 - y12) if lx <= (sax + sbx) / 2 and ly <= (say + sby) / 2: return True else: return Falsedef get_iou(pred_box, gt_box): ”“” 计算给定输入之间的iou,并返回 “”“ if mat_inter(pred_box, gt_box): x01, y01, x02, y02 = pred_box x11, y11, x12, y12 = gt_box col = min(x02, x12) - max(x01, x11) row = min(y02, y12) - max(y01, y11) intersection = col * row area1 = (x02 - x01) * (y02 - y01) area2 = (x12 - x11) * (y12 - y11) iou = intersection / (area1 + area2 - intersection) else: iou = 0 return ioudef get_iou_idex(pred_box, gt_box_list): ”“” 计算iou, 并返回最大的iou值和对应的gt_box对应的索引值,index “”“ max_iou = 0 # 开始设置为一个极小值 max_index = -1 # 开始随机设置一个值 for i in range(len(gt_box_list)): temp_iou = get_iou(pred_box, gt_box_list[i]) if temp_iou > max_iou: max_index = i max_iou = temp_iou return max_iou, max_indexdef judge_tp_fp(pred_box_list, gt_box_list,score,score_list,class_num,pre_label): ”“” 计算并统计TP,FP “”“ true_sample_num = len(gt_box_list) print('待检测真实物体个数:{}'.format(true_sample_num)) pred_class_num = len(pred_box_list) print('NMS之后预测框个数:{}'.format(pred_class_num)) gt_box_flag = [0] * true_sample_num class_score_poss = [[] for _ in range(class_num)] for i in range(pred_class_num): iou, index = get_iou_idex(pred_box_list[i], gt_box_list) #print(iou,index) if iou > score: if gt_box_flag[index]==0: class_score_poss[int(pre_label[i])].append([score_list[i],1.0]) gt_box_flag[index] = 1 else: class_score_poss[int(pre_label[i])].append([score_list[i],0.0]) else: class_score_poss[int(pre_label[i])].append([score_list[i],0.0]) return class_score_possdef get_tp_fp_accum( score_pos_list): ”“” 计算累计AccTP,AccFP “”“ sorted_list = sorted(score_pos_list, key=lambda s: s[0], reverse=True) accum_tp = 0 accum_fp = 0 accum_tp_list = [] accum_fp_list = [] for (score, pos) in sorted_list: accum_tp += int(pos) accum_tp_list.append(accum_tp) accum_fp += 1 - int(pos) accum_fp_list.append(accum_fp) return accum_tp_list, accum_fp_listdef get_mAP(pred_box_list, gt_box_list,gt_label, score,score_list,pre_label,map_type='11point',class_num=4): ''' 计算mAP ''' Lable_Map=['crosswalk','speedlimit','stop','trafficlight'] mAP=0 valid_cnt=0 class_gt_counts = [0] * class_num eval_result=[] for i,gtl in enumerate(gt_label): class_gt_counts[int(gtl)] += 1 print('待检测物体每个类别对应个数:ncrosswalk:{} speedlimit:{} stop:{} trafficlight:{}'.format(class_gt_counts[0],class_gt_counts[1],class_gt_counts[2],class_gt_counts[3])) class_score_pos=judge_tp_fp(pred_box_list, gt_box_list,score,score_list,class_num,pre_label) print('预测每个类别对应个数:ncrosswalk:{} speedlimit:{} stop:{} trafficlight:{}'.format(len(class_score_pos[0]),len(class_score_pos[1]),len(class_score_pos[2]),len(class_score_pos[3]))) for score_pos, count in zip(class_score_pos,class_gt_counts): if count == 0: continue if len(score_pos) == 0: valid_cnt += 1 continue accum_tp_list, accum_fp_list = get_tp_fp_accum(score_pos) precision = [] recall = [] for ac_tp, ac_fp in zip(accum_tp_list, accum_fp_list): precision.append(float(ac_tp) / (ac_tp + ac_fp)) recall.append(float(ac_tp) / count) one_class_ap = 0.0 if map_type == '11point': max_precisions = [0.] * 11 start_idx = len(precision) - 1 for j in range(10, -1, -1): for i in range(start_idx, -1, -1): if recall[i] < float(j) / 10.: start_idx = i if j > 0: max_precisions[j - 1] = max_precisions[j] break else: if max_precisions[j] < precision[i]: max_precisions[j] = precision[i] one_class_ap = sum(max_precisions) / 11. mAP += one_class_ap valid_cnt += 1 elif map_type == 'integral': import math prev_recall = 0. for i in range(len(precision)): recall_gap = math.fabs(recall[i] - prev_recall) if recall_gap > 1e-6: one_class_ap += precision[i] * recall_gap prev_recall = recall[i] mAP += one_class_ap valid_cnt += 1 eval_result.append({ 'class':Lable_Map[valid_cnt-1], 'AP':round(one_class_ap,2), 'precision':round(precision[len(precision)-1],2), 'recall':round(recall[len(recall)-1],2)}) mAP = mAP / float(valid_cnt) if valid_cnt > 0 else mAP return mAP,eval_result登录后复制
--3、进行测试集预测
In [?]#自定义测试数据集实现异步数据读取class TEST_dataset(Dataset): def __init__(self): super(TEST_dataset,self).__init__() self.data_dir=[] #获取图片路径和标注信息路径 with open('test_list.txt') as f: for line in f.readlines(): info=line.strip().split(' ') if len(info)>0: self.data_dir.append(info[0].strip()) self.transforms=pt.Compose([ pt.Resize((416,416)), pt.ToTensor(),#转变成张量格式 pt.Normalize(mean=[0.485,0.456,0.406],std=[0.229,0.224,0.225])]) def __getitem__(self,index): img_file=self.data_dir[index] img = Image.open(img_file) w,h=img.size if img.mode != 'RGB': img=img.convert('RGB') img=self.transforms(img) return img_file,img,np.array([h,w]) def __len__(self): return (len(self.data_dir))test_dataset_1=TEST_dataset()print('测试集数目:{}n图片路径:{}n输入网络图片尺寸:{}n原图大小[H,W]:{}'.format(len(test_dataset),test_dataset_1[3][0],test_dataset_1[3][1].shape,test_dataset_1[3][2]))登录后复制In [26]
#在测试集上进行预测,生成预测结果的json文件import jsonimport osimport timeANCHORS = [15, 15, 29, 23, 44, 34, 28, 62, 62, 46, 81, 64, 100, 99, 153, 160, 240, 310]ANCHOR_MASKS = [[6, 7, 8], [3, 4, 5], [0, 1, 2]]VALID_THRESH = 0.1NMS_TOPK = 400NMS_POSK = 100NMS_THRESH = 0.45NUM_CLASSES = 4batch_size=1time_cost=[]def test(mode): use_gpu = True paddle.set_device('gpu:0') if use_gpu else paddle.set_device('cpu') model.eval() total_results = [] test_loader = paddle.io.DataLoader(test_dataset_1,batch_size=batch_size,shuffle=False,drop_last=True) for i, data in enumerate(test_loader()): t1 = time.time() img_name, img_data,img_size = data H,W=np.array(img_size[0]) img = paddle.to_tensor(img_data) img = paddle.cast(img,'float32') img_scale=[[416,416]]*batch_size img_scale=paddle.to_tensor(img_scale,dtype='int32') outputs = model.forward(img)#输出P0,P1,P2 #bboxes:[N,M,4] #scores:[N,class_num,M] bboxes, scores = model.get_pred(outputs, im_shape=img_scale, anchors=ANCHORS, anchor_masks=ANCHOR_MASKS, valid_thresh = VALID_THRESH) bboxes_data = bboxes.numpy() scores_data = scores.numpy() #result中包含了一个batch的图片 result = multiclass_nms(bboxes_data, scores_data, score_thresh=VALID_THRESH, nms_thresh=NMS_THRESH, pre_nms_topk=NMS_TOPK, pos_nms_topk=NMS_POSK) for i in range(len(result)): re=result[i] for j in range(len(re)): result[i][j][2]=result[i][j][2]/416*W #x1 result[i][j][3]=result[i][j][3]/416*H #y1 result[i][j][4]=result[i][j][4]/416*W #x2 result[i][j][5]=result[i][j][5]/416*H #y2 pred_time = time.time() - t1 time_cost.append(pred_time) for j in range(len(result)): result_j = result[j] #print(type(result_j)) img_name_j = img_name[j] #判断result_j是否是空列表 if isinstance(result_j,list): result_j=result_j else: result_j=result_j.tolist() total_results.append([img_name_j, result_j]) # print('processed {} pictures'.format(len(total_results))) mean_time=sum(time_cost[3:])/len(time_cost[3:]) FPS=1/mean_time print('图片预测结果查看:n{}'.format(total_results[0])) total_gt_box,total_gt_label=get_total_box_label('test_list.txt') total_pre_box,total_pre_label,total_pre_score=get_pre_score_box_label(total_results) mAP,eval_result=get_mAP(pred_box_list=total_pre_box, gt_box_list=total_gt_box, gt_label=total_gt_label, score=0.5, score_list=total_pre_label, pre_label=total_pre_label, map_type='11point', class_num=4) print('mAP(0.5,11point):{:.2f}%'.format(mAP*100)) print('各个类别评价结果:{}'.format(eval_result)) print('FPS:{:.2f}'.format(FPS)) #json.dump(total_results, open('pred_results.json', 'w'))#加载之前训练保存好的模型参数model = YOLOv3(num_classes=NUM_CLASSES)params_file_path = '1120epochs/yolo_epoch5.pdparams'model_state_dict = paddle.load(params_file_path)model.load_dict(model_state_dict)test(model)登录后复制
图片预测结果查看:['JPEGImages/road652.png', [[0.0, 0.9860504269599915, 99.39495233389047, 163.6840086716872, 117.82508996816782, 183.31279754638672], [1.0, 0.9990728497505188, 134.72467936002292, 172.93702639066254, 152.86380694462702, 191.34206038254956], [1.0, 0.9960757493972778, 78.14298226283147, 181.92740220289966, 93.95055770874023, 197.56082388070914]]]待检测物体每个类别对应个数:crosswalk:29 speedlimit:78 stop:7 trafficlight:18待检测真实物体个数:132NMS之后预测框个数:145预测每个类别对应个数:crosswalk:35 speedlimit:81 stop:8 trafficlight:21mAP(0.5,11point):81.52%各个类别评价结果:[{'class': 'crosswalk', 'AP': 0.89, 'precision': 0.83, 'recall': 1.0}, {'class': 'speedlimit', 'AP': 1.0, 'precision': 0.98, 'recall': 1.01}, {'class': 'stop', 'AP': 0.73, 'precision': 0.75, 'recall': 0.86}, {'class': 'trafficlight', 'AP': 0.65, 'precision': 0.76, 'recall': 0.89}]FPS:21.95登录后复制
--4、预测图片并且进行可视化展示
In [27]import matplotlib.patches as patchesfrom matplotlib.image import imreadimport cv2Lable_Map=['crosswalk','speedlimit','stop','trafficlight']# 定义画矩形框的函数 def draw_rectangle(currentAxis, bbox, edgecolor = 'k', facecolor = 'y', fill=False, linestyle='-'): # currentAxis,坐标轴,通过plt.gca()获取 # bbox,边界框,包含四个数值的list, [x1, y1, x2, y2] # edgecolor,边框线条颜色 # facecolor,填充颜色 # fill, 是否填充 # linestype,边框线型 # patches.Rectangle需要传入左上角坐标、矩形区域的宽度、高度等参数 rect=patches.Rectangle((bbox[0], bbox[1]), bbox[2]-bbox[0]+1, bbox[3]-bbox[1]+1, linewidth=3, edgecolor=edgecolor,facecolor=facecolor,fill=fill, linestyle=linestyle) #将画出的矩形添加到图像当中 currentAxis.add_patch(rect)# 定义绘制预测结果的函数def draw_results(result, filename, draw_thresh=0.1): #低于draw_thresh的预测框不用画 plt.figure(figsize=(10, 10)) im = imread(filename) plt.imshow(im) #获取坐标轴 currentAxis=plt.gca() colors = ['b', 'r', 'y','g'] for item in result: box = item[2:6] label = int(item[0]) name = Lable_Map[label] if item[1] > draw_thresh: draw_rectangle(currentAxis, box, edgecolor = colors[label]) plt.text(box[0], box[1], name, fontsize=20, color=colors[label])登录后复制In [28]
#定义一下测试可视化函数def test_img(img_file): ANCHORS = [15, 15, 29, 23, 44, 34, 28, 62, 62, 46, 81, 64, 100, 99, 153, 160, 240, 310] ANCHOR_MASKS = [[6, 7, 8], [3, 4, 5], [0, 1, 2]] VALID_THRESH = 0.1 NMS_TOPK = 400 NMS_POSK = 100 NMS_THRESH = 0.45 NUM_CLASSES = 4 transforms=pt.Compose([ pt.Resize((416,416)), pt.ToTensor(), pt.Normalize(mean=[0.485,0.456,0.406],std=[0.229,0.224,0.225])]) img = Image.open(img_file) W,H=img.size if img.mode != 'RGB': img=img.convert('RGB') img=transforms(img) params_file_path = '1120epochs/yolo_epoch5.pdparams' model = YOLOv3(num_classes=NUM_CLASSES) model_state_dict = paddle.load(params_file_path) model.load_dict(model_state_dict) model.eval() total_results = [] #一定要注意类型转换 img = paddle.to_tensor(img,dtype='float32') img=paddle.reshape(img,[1,3,416,416]) img_scale=[[416,416]] img_scale = paddle.to_tensor(img_scale,dtype='int32') outputs = model.forward(img) bboxes, scores = model.get_pred(outputs, im_shape=img_scale, anchors=ANCHORS, anchor_masks=ANCHOR_MASKS, valid_thresh = VALID_THRESH) bboxes_data = bboxes.numpy() scores_data = scores.numpy() results = multiclass_nms(bboxes_data, scores_data, score_thresh=VALID_THRESH, nms_thresh=NMS_THRESH, pre_nms_topk=NMS_TOPK, pos_nms_topk=NMS_POSK) result = results[0] #适配一下原图,方便可视化 for i in range(len(result)): result[i][2]=result[i][2]/416*W #x1 result[i][3]=result[i][3]/416*H #y1 result[i][4]=result[i][4]/416*W #x2 result[i][5]=result[i][5]/416*H #y2 #print(result) draw_results(result, img_file, draw_thresh=0.1)登录后复制In [39]
import random#从测试集中随便挑5张来看看下效果data_dir=[]#获取图片路径with open('test_list.txt') as f: for line in f.readlines(): info=line.strip().split(' ') if len(info)>0: data_dir.append(info[0].strip())#产生5个随机整数index=random.sample(range(0,87),5)for i,ind in enumerate(index): img_file = data_dir[ind] print(img_file) test_img(img_file)登录后复制
JPEGImages/road412.pngJPEGImages/road596.pngJPEGImages/road592.pngJPEGImages/road821.pngJPEGImages/road434.png登录后复制
<Figure size 720x720 with 1 Axes>登录后复制登录后复制登录后复制登录后复制登录后复制登录后复制登录后复制登录后复制登录后复制登录后复制登录后复制登录后复制登录后复制登录后复制登录后复制登录后复制登录后复制
<Figure size 720x720 with 1 Axes>登录后复制登录后复制登录后复制登录后复制登录后复制登录后复制登录后复制登录后复制登录后复制登录后复制登录后复制登录后复制登录后复制登录后复制登录后复制登录后复制登录后复制
<Figure size 720x720 with 1 Axes>登录后复制登录后复制登录后复制登录后复制登录后复制登录后复制登录后复制登录后复制登录后复制登录后复制登录后复制登录后复制登录后复制登录后复制登录后复制登录后复制登录后复制
<Figure size 720x720 with 1 Axes>登录后复制登录后复制登录后复制登录后复制登录后复制登录后复制登录后复制登录后复制登录后复制登录后复制登录后复制登录后复制登录后复制登录后复制登录后复制登录后复制登录后复制
<Figure size 720x720 with 1 Axes>登录后复制登录后复制登录后复制登录后复制登录后复制登录后复制登录后复制登录后复制登录后复制登录后复制登录后复制登录后复制登录后复制登录后复制登录后复制登录后复制登录后复制In [29]
#从百度上每个类别找了三张for img_path in(os.listdir('extra_test')): img_file='extra_test/'+str(img_path) if img_file[-4::]=='.jpg': test_img(img_file)登录后复制
<Figure size 720x720 with 1 Axes>登录后复制登录后复制登录后复制登录后复制登录后复制登录后复制登录后复制登录后复制登录后复制登录后复制登录后复制登录后复制登录后复制登录后复制登录后复制登录后复制登录后复制
<Figure size 720x720 with 1 Axes>登录后复制登录后复制登录后复制登录后复制登录后复制登录后复制登录后复制登录后复制登录后复制登录后复制登录后复制登录后复制登录后复制登录后复制登录后复制登录后复制登录后复制
<Figure size 720x720 with 1 Axes>登录后复制登录后复制登录后复制登录后复制登录后复制登录后复制登录后复制登录后复制登录后复制登录后复制登录后复制登录后复制登录后复制登录后复制登录后复制登录后复制登录后复制
<Figure size 720x720 with 1 Axes>登录后复制登录后复制登录后复制登录后复制登录后复制登录后复制登录后复制登录后复制登录后复制登录后复制登录后复制登录后复制登录后复制登录后复制登录后复制登录后复制登录后复制
<Figure size 720x720 with 1 Axes>登录后复制登录后复制登录后复制登录后复制登录后复制登录后复制登录后复制登录后复制登录后复制登录后复制登录后复制登录后复制登录后复制登录后复制登录后复制登录后复制登录后复制
<Figure size 720x720 with 1 Axes>登录后复制登录后复制登录后复制登录后复制登录后复制登录后复制登录后复制登录后复制登录后复制登录后复制登录后复制登录后复制登录后复制登录后复制登录后复制登录后复制登录后复制
<Figure size 720x720 with 1 Axes>登录后复制登录后复制登录后复制登录后复制登录后复制登录后复制登录后复制登录后复制登录后复制登录后复制登录后复制登录后复制登录后复制登录后复制登录后复制登录后复制登录后复制
<Figure size 720x720 with 1 Axes>登录后复制登录后复制登录后复制登录后复制登录后复制登录后复制登录后复制登录后复制登录后复制登录后复制登录后复制登录后复制登录后复制登录后复制登录后复制登录后复制登录后复制
<Figure size 720x720 with 1 Axes>登录后复制登录后复制登录后复制登录后复制登录后复制登录后复制登录后复制登录后复制登录后复制登录后复制登录后复制登录后复制登录后复制登录后复制登录后复制登录后复制登录后复制
<Figure size 720x720 with 1 Axes>登录后复制登录后复制登录后复制登录后复制登录后复制登录后复制登录后复制登录后复制登录后复制登录后复制登录后复制登录后复制登录后复制登录后复制登录后复制登录后复制登录后复制
<Figure size 720x720 with 1 Axes>登录后复制登录后复制登录后复制登录后复制登录后复制登录后复制登录后复制登录后复制登录后复制登录后复制登录后复制登录后复制登录后复制登录后复制登录后复制登录后复制登录后复制
<Figure size 720x720 with 1 Axes>登录后复制登录后复制登录后复制登录后复制登录后复制登录后复制登录后复制登录后复制登录后复制登录后复制登录后复制登录后复制登录后复制登录后复制登录后复制登录后复制登录后复制
来源:https://www.php.cn/faq/1410155.html
免责声明:文中图文均来自网络,如有侵权请联系删除,心愿游戏发布此文仅为传递信息,不代表心愿游戏认同其观点或证实其描述。
相关文章
更多-

- nef 格式图片降噪处理用什么工具 效果如何
- 时间:2025-07-29
-

- 邮箱长时间未登录被注销了能恢复吗?
- 时间:2025-07-29
-

- Outlook收件箱邮件不同步怎么办?
- 时间:2025-07-29
-

- 为什么客户端收邮件总是延迟?
- 时间:2025-07-29
-

- 一英寸在磁带宽度中是多少 老式设备规格
- 时间:2025-07-29
-

- 大卡和年龄的关系 不同年龄段热量需求
- 时间:2025-07-29
-

- jif 格式是 gif 的变体吗 现在还常用吗
- 时间:2025-07-29
-

- hdr 格式图片在显示器上能完全显示吗 普通显示器有局限吗
- 时间:2025-07-29
大家都在玩
大家都在看
更多-
- 炉石传说CTTlabarashh永时奇闻瞎卡组代码分享
- 时间:2025-11-06
-
- 炉石传说CTThomiwas火龙德卡组代码分享
- 时间:2025-11-06
-
- 炉石传说CTTAlexander爆发贼卡组代码分享
- 时间:2025-11-06
-
- 炉石传说CTThomi自然萨卡组代码分享
- 时间:2025-11-06
-

- 傲游浏览器怎么设置自定义主页
- 时间:2025-11-06
-

- 好听两个字情侣网名 唯美2字的游戏名
- 时间:2025-11-06
-

- 2?2?/??.????一种很新的十一月朋友圈
- 时间:2025-11-06
-

- 笔记本Fn键失灵修复小技巧
- 时间:2025-11-06


