【Al达人特训营】基于狗鼻子识别狗狗身份
时间:2025-07-24 | 作者: | 阅读:0本项目通过狗鼻子纹路识别狗狗身份,类似人类指纹识别。使用含6000个狗狗id、20000个鼻纹图像的数据集,分训练集和测试集。用Resnet50模型,经25轮训练,测试集准确率达79.69%;还尝试通过余弦相似度计算,因训练轮次和数据量不足,精度仅30%多,后续需优化。
通过狗鼻子纹路来识别狗狗身份
1. 项目概述
人类可以通过指纹来辨别是否为同一个人,而狗同样可以通过鼻子上面的纹路来辨别是不是同一只狗。如果仔细观察狗的鼻子,您会发现狗的鼻子表面,有许多仿佛桑葚一样的纹路。而研究表明,每一只狗鼻子上面的编号都是独一无二的,因此可以使用它们来作为识别狗的一种方式,它的作用等同于人类手指上的指纹。

本项目主要通过识别狗狗的鼻子纹路,从而来判断当前这只狗狗的身份id。主要是通过Resnet50来实现,但也尝试取一部分数据集通过图片的相似度计算,实现狗狗身份的识别。
2.数据集介绍
数据集由6000个狗狗id,20000个狗狗鼻纹图像组成。其中每一个狗狗id为一个文件夹,里面包含若干张狗狗鼻子纹路的图片和经数据增强的狗狗鼻子纹路的图片。其中每一张图片有相应的编号,其中2975_A_ap7NQ5mzS8QAAAAAAAAAAAAAAQAAAQ的 2975 代表狗狗的编号,而经过数据增强的狗鼻子纹路每张图片的名称末尾都会有个 -0 标志,如2975_A_ap7NQ5mzS8QAAAAAAAAAAAAAAQAAAQ-0。
? ? ? ? ?2975_A_ap7NQ5mzS8QAAAAAAAAAAAAAAQAAAQ(原始图片) 2975_A_ap7NQ5mzS8QAAAAAAAAAAAAAAQAAAQ-0(数据增强后的图片)
加载数据集、导入必要的包
In [1]!unzip /home/aistudio/data/data151224/dir_train.zip -d /home/aistudio/work/ #解压数据集到work下面,之后再开启时就可不运行该语句登录后复制 ? ?In [2]
import osimport paddleimport randomimport numpy as npfrom PIL import Imageimport matplotlib.pyplot as pltimport paddle.nn.functional as F登录后复制 ? ?
3.划分数据集,生成训练集和测试集
In [?]import osimport randomimport numpy as npx_train = np.zeros((37459, 3, 224, 224))class_dict = {}class_id = 0 #一开始狗狗的编号是从0开始,也就是说狗狗是从第0类开始path='work/dir_train'file_list=os.listdir(path)file_list.sort(key=lambda x: int(x[0:4]))for img_file in file_list: cur_path=os.path.join(path,img_file) if os.path.isdir(cur_path): imgs=os.listdir(cur_path) for img in imgs: if 'jpg' in img: dog_id = img_file if dog_id not in class_dict: class_dict[dog_id]=class_id class_id+=1fege=[] #将改变了的图片提取出来用于valother_imgs=[] #用于test的划分total=[]total_end=[]for img_file in file_list: cur_path=os.path.join(path,img_file) if os.path.isdir(cur_path): imgs=os.listdir(cur_path) for img in imgs: if 'jpg' in img: dog_id = img_file last_path =cur_path+'/'+img line = '%s %sn' % (last_path, class_dict[dog_id]) total.append(line) fege=img.split('.') if(fege[0][-1]=='0'): other_imgs.append(line)print('all',len(total))# random.seed(0)#保证每次产生相同的随机数# random.shuffle(other_imgs)#打乱名称次序length=len(other_imgs)test= other_imgs[:int(length*0.06)]print('test',len(test))for index in total: if index not in test: total_end.append(index)train = total_endprint('train',len(total_end))with open('work/data/train.txt', 'w', encoding='UTF-8') as f: for line in train: f.write(line) with open('work/data/test.txt', 'w', encoding='UTF-8') as f: for line in test: f.write(line)登录后复制 ? ? ? ?
all 38636test 1177train 37459登录后复制 ? ? ? ?
4.数据集的定义与加载
In [4]import osimport cv2import numpy as npfrom paddle.io import Datasetclass MyDataset(Dataset): def __init__(self,label_path, transform=None):#初始化数据集,将样本和标签映射到列表中 super(MyDataset, self).__init__() self.data_list = [] with open(label_path,encoding='UTF-8') as f: for line in f.readlines(): image_path, label = line.strip().split(' ') self.data_list.append([image_path, label]) self.transform = transform def __getitem__(self, index):#定义指定index时如何获取数据,并返回单条数据(样本数据、对应的标签) global x_train,y_train # 根据索引,从列表中取出一个图像 image_path, label = self.data_list[index] # 读取图片(以图片原本的形式加载) image = cv2.imread(image_path, cv2.IMREAD_UNCHANGED) # 飞桨训练时内部数据格式默认为float32,将图像数据格式转换为 float32 image = image.astype('float32') image = image /255. if self.transform is not None: image = self.transform(image) label = np.array([int(label)]) # 返回图像和对应标签 return image, label def __len__(self):#返回数据集的样本总数 return len(self.data_list)登录后复制 ? ?
5.数据增强
在这里我们直接使用paddle.vision.transforms里面自带的数据增强函数。其内置了数十种图像数据处理方法,如Resize、ColorJitter、RandomHorizontalFlip等
In [5]import paddle.vision.transforms as T''' 对数据进行size修改,随机调整图像的亮度、对比度、饱和度和色调、基于概率来执行图片的水平翻转'''transform = T.Compose([T.Resize(size=(224,224)),T.ColorJitter(),T.RandomHorizontalFlip(0.5),T.Transpose((2, 0, 1))])train_dataset = MyDataset('work/data/train.txt', transform)test_dataset = MyDataset('work/data/test.txt', transform)print('train_dataset images: ',len(train_dataset),' test_dataset images: ',len(test_dataset))登录后复制 ? ? ? ?
train_dataset images: 37459 test_dataset images: 1177登录后复制 ? ? ? ?
6.数据显示
随机挑选狗鼻子显示,在这里我们挑选了四张
此处显示的图片均已通过数据增强处理
In [?]from PIL import Imageheight_width = 224show_train = np.zeros((4, 3, 224, 224), dtype='float32')def show_image(img,length): box_size = height_width+4 num_rows=1 num_cols=length collage=Image.new(mode=”RGB“, size=(num_cols * box_size,num_rows * box_size), color=(255, 255, 255)) for col_idx in range(num_cols): array = (np.array(img[col_idx]) * 255).astype(np.uint8) array = array.transpose(1,2,0) #将我们要显示的图贴在我们刚刚创建的collage版上 collage.paste( Image.fromarray(array), (col_idx* box_size,(num_rows-1)* box_size)#将显示的图片贴在第几行,这里设置以(列,行)为准 ) collage = collage.resize(( num_cols * box_size, num_rows * box_size)) return collagerandom_images=np.random.randint(0,37459,size=4)length=len(random_images)for index in range(length): put=random_images[index] show_train[index,:,:,:]=train_dataset[put][0]show_image(show_train,length)登录后复制 ? ? ? ?
<PIL.Image.Image image mode=RGB size=912x228 at 0x7F77C2810B50>登录后复制 ? ? ? ? ? ? ? ?
7.通过Resnet50实现狗狗身份的识别
1.模型组网,主要使用resnet50,在这我们直接调用paddle.vision.models下内置模型resnet50来实现
In [?]import paddle# 定义并初始化数据读取器train_loader = paddle.io.DataLoader(train_dataset, batch_size=128, shuffle=True, num_workers=3, drop_last=True)# 调用DataLoader迭代读取数据for batch_id, data in enumerate(train_loader()): imgs, labels = data print(”batch_id: {}, 训练数据shape: {}, 标签数据shape: {}“.format(batch_id, imgs.shape, labels.shape)) break登录后复制 ? ? ? ?
batch_id: 0, 训练数据shape: [128, 3, 224, 224], 标签数据shape: [128, 1]登录后复制 ? ? ? ?In [?]
#由于一共有6000个狗狗的id,所以在这我们的类别为6000resnet50 = paddle.vision.models.resnet50(num_classes=6000)paddle.summary(resnet50,(1,3, 224, 224)) # 可视化模型组网结构和参数登录后复制 ? ?
2.训练过程可视化
In [15]import matplotlib.pyplot as pltdef draw_train_process(title,iters,loss,accs,label_cost,lable_acc): plt.title(title, fontsize=24) plt.xlabel(”iter“, fontsize=20) plt.ylabel(”loss/acc“, fontsize=20) plt.plot(iters, loss,color='red',label=label_cost) plt.plot(iters, accs,color='green',label=lable_acc) plt.legend() plt.grid() plt.show()登录后复制 ? ?
3.结果预测可视化
In [?]height_width=224show_test = np.zeros((2, 3, 224, 224), dtype='float32')def show_result(img,length): box_size = height_width+4 num_rows=1 num_cols=length collage=Image.new(mode=”RGB“, size=(num_cols * box_size,num_rows * box_size), color=(255, 255, 255)) for col_idx in range(num_cols): array = (np.array(img[col_idx]) * 255).astype(np.uint8) array = array.transpose(1,2,0) #将我们要显示的图贴在我们刚刚创建的collage版上 collage.paste( Image.fromarray(array), (col_idx* box_size,(num_rows-1)* box_size)#将显示的图片贴在第几行,这里设置以(列,行)为准 ) collage = collage.resize(( num_cols * box_size, num_rows * box_size)) return collage登录后复制 ? ?
4.模型训练
In [?]batch_size=128def train(model): all_train_iter=0 all_train_iters=[] all_train_loss=[] all_train_accs=[] print('start training ... ') model.train() epoch_num = 25 opt = paddle.optimizer.Adam(learning_rate=0.0001,parameters=model.parameters()) loss_fn = paddle.nn.CrossEntropyLoss() for epoch in range(epoch_num): for batch_id, data in enumerate(train_loader()): trains_data = data[0] # 训练数据 labels_data = data[1] # 训练数据标签 predicts = model(trains_data) # 预测结果 loss=loss_fn(predicts,labels_data)#计算loss all_train_iter=all_train_iter+batch_size acc=paddle.metric.accuracy(predicts, labels_data) #计算acc all_train_iters.append(all_train_iter) all_train_loss.append(loss) all_train_accs.append(acc) # 反向传播 loss.backward() if batch_id % 500 == 0: print(”epoch: {}, batch_id: {}, loss is: {}, acc is: {}“.format(epoch, batch_id, loss.numpy(), acc.numpy())) # 更新参数 opt.step() # 梯度清零 opt.clear_grad() draw_train_process(”training“,all_train_iters,all_train_loss,all_train_accs,”trainning loss“,”trainning acc“)登录后复制 ? ?In [?]
train(resnet50)登录后复制 ? ? ? ?
start training ... epoch: 0, batch_id: 0, loss is: [8.981798], acc is: [0.]epoch: 1, batch_id: 0, loss is: [8.651112], acc is: [0.]epoch: 2, batch_id: 0, loss is: [8.373802], acc is: [0.]epoch: 3, batch_id: 0, loss is: [7.1893845], acc is: [0.0078125]epoch: 4, batch_id: 0, loss is: [6.146961], acc is: [0.078125]epoch: 5, batch_id: 0, loss is: [4.7313113], acc is: [0.171875]epoch: 6, batch_id: 0, loss is: [3.5785356], acc is: [0.296875]epoch: 7, batch_id: 0, loss is: [2.3126612], acc is: [0.546875]epoch: 8, batch_id: 0, loss is: [1.5904088], acc is: [0.671875]epoch: 9, batch_id: 0, loss is: [0.8497794], acc is: [0.84375]epoch: 10, batch_id: 0, loss is: [0.7214346], acc is: [0.890625]epoch: 11, batch_id: 0, loss is: [0.6924722], acc is: [0.8515625]epoch: 12, batch_id: 0, loss is: [0.48501003], acc is: [0.9375]epoch: 13, batch_id: 0, loss is: [0.3722474], acc is: [0.921875]epoch: 14, batch_id: 0, loss is: [0.18851474], acc is: [0.984375]epoch: 15, batch_id: 0, loss is: [0.22275692], acc is: [0.9765625]epoch: 16, batch_id: 0, loss is: [0.11395013], acc is: [0.9921875]epoch: 17, batch_id: 0, loss is: [0.11722957], acc is: [0.9921875]epoch: 18, batch_id: 0, loss is: [0.09408636], acc is: [0.9921875]epoch: 19, batch_id: 0, loss is: [0.09137408], acc is: [0.984375]epoch: 20, batch_id: 0, loss is: [0.06177511], acc is: [1.]epoch: 21, batch_id: 0, loss is: [0.0960395], acc is: [0.984375]epoch: 22, batch_id: 0, loss is: [0.05559403], acc is: [0.9921875]epoch: 23, batch_id: 0, loss is: [0.07681009], acc is: [0.9921875]epoch: 24, batch_id: 0, loss is: [0.09800377], acc is: [0.9921875]登录后复制 ? ? ? ?
/opt/conda/envs/python35-paddle120-env/lib/python3.7/site-packages/matplotlib/cbook/__init__.py:2349: DeprecationWarning: Using or importing the ABCs from 'collections' instead of from 'collections.abc' is deprecated, and in 3.8 it will stop working if isinstance(obj, collections.Iterator):/opt/conda/envs/python35-paddle120-env/lib/python3.7/site-packages/matplotlib/cbook/__init__.py:2366: DeprecationWarning: Using or importing the ABCs from 'collections' instead of from 'collections.abc' is deprecated, and in 3.8 it will stop working return list(data) if isinstance(data, collections.MappingView) else data登录后复制 ? ? ? ?
<Figure size 432x288 with 1 Axes>登录后复制 ? ? ? ? ? ? ? ?
5.模型预测
In [?]# 加载测试数据集 from PIL import Image test_loader = paddle.io.DataLoader(test_dataset, batch_size=64, drop_last=True)loss_fn = paddle.nn.CrossEntropyLoss()# 将该模型及其所有子层设置为预测模式resnet50.eval()for batch_id, data in enumerate(test_loader()):# # 取出测试数据 test_data = data[0] test_label_data = data[1] box_size=228# # 获取预测结果 predicts = resnet50(test_data)print(”predict finished“)loss=loss_fn(predicts,test_label_data)acc=paddle.metric.accuracy(predicts,test_label_data) print(”loss is: {}, acc is: {}“.format(loss.numpy(), acc.numpy()))# # 从测试集中取出一组数据img, label = test_loader().next()# # 执行推理并打印结果pred_label = resnet50(img)[0].argmax()print('true label: {}, pred label: {}'.format(label[0].item(), pred_label[0].item()))# # 可视化图片show_test[0,:,:,:]=train_dataset[label[0].item()][0]#存放真实值show_test[1,:,:,:]=img[0]#存放预测值show_result(show_test,2)登录后复制 ? ? ? ?
predict finishedloss is: [1.1780074], acc is: [0.796875]true label: 0, pred label: 0登录后复制 ? ? ? ?
<PIL.Image.Image image mode=RGB size=456x228 at 0x7F08E9C30810>登录后复制 ? ? ? ? ? ? ? ?
8.通过相似度计算实现狗狗身份的识别
思路:先将图片使用卷积神经网络转换为高维空间的向量表示,然后计算两张图片间的相似程度。此处相似度计算我们通过余弦相似度来求得。在模型训练阶段,其训练目标是让同一类别的图片的相似程度尽可能的高,不同类别的图片的相似程度尽可能的低。图片间的相似度越高,我们就能知道这张图片是属于哪个狗狗的。
什么是余弦相似度?
一.原理
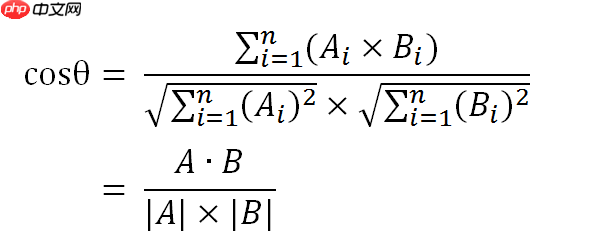
余弦相似度算法:一个向量空间中两个向量夹角间的余弦值作为衡量两个个体之间差异的大小,余弦值接近1,夹角趋于0,表明两个向量越相似,余弦值接近于0,夹角趋于90度,表明两个向量越不相似。
二.计算公式
1.二维空间中余弦函数的公式:
? ? ? ?2.多维空间余弦函数的公式
在n维空间中如果有两个向量,向量a(a1,a2,a3,....,an),向量b(b1,b2,b3,....bn),根据点积公式可得:
? ? ? ?余弦相似度判别
相似度越小,距离越大。相似度越大,距离越小。
1.获取训练集和测试集里的所有图片的标签
In [6]y_train= np.zeros((37459, 1), dtype='int64')#这里我们取37459是因为我们划分的训练集大小为37459for i in range(len(train_dataset)): y_train[i, 0] = train_dataset[i][1]登录后复制 ? ?In [7]
y_test= np.zeros((1177, 1), dtype='int64')#这里我们取1177是因为我们划分的测试集大小为1177for i in range(len(test_dataset)): y_test[i, 0] = test_dataset[i][1]登录后复制 ? ?In [8]
y_train = np.squeeze(y_train)#删除y_train数组的单维度y_test = np.squeeze(y_test)登录后复制 ? ?In [9]
print('y_train',y_train)print('y_test',y_test)登录后复制 ? ? ? ?
y_train [ 0 0 1 ... 5999 5999 5999]y_test [ 0 0 1 ... 565 565 566]登录后复制 ? ? ? ?
2.分别将数据集和训练集里同一狗狗id的图片序号给集合起来,便于后面图片间的相似度计算
In [10]from collections import defaultdictclass_to_train = defaultdict(list)for train_idx, label in enumerate(y_train): class_to_train[label].append(train_idx)class_to_test = defaultdict(list)for test_idx, label in enumerate(y_test): class_to_test[label].append(test_idx)登录后复制 ? ?
3.定义并初始化数据读取器
bug出现了!
此处设置的数据读取器有个bug,一开始 num_classes 设为 6000类别可以继续执行下部操作,但后面重启后再运行,每次都卡在这个地方,头疼。在这我将 num_classes 设为40就可以正常运行。可能种类太多溢出了,但是很怪,毕竟前一天运行是可以的。由于后面将类别设置为60000时会出现内存不够的现象。但是还是想看一下基于图片相似度计算的效果,所以在这将类别设置为40,进行小小的测试。
In [11]import randomheight_width=224num_classes = 40def read_iterator(num_batches): iter_step = 0 while True: if iter_step > num_batches: break iter_step+=1 # random_images=np.random.randint(0,100,size=num_classes) x = np.empty((2, num_classes, 3, height_width, height_width), dtype=np.float32) for index in range(num_classes): # examples_for_class = class_to_train[random_images[index]] examples_for_class = class_to_train[index] anchor_idx = random.choice(examples_for_class) positive_idx = random.choice(examples_for_class) while positive_idx == anchor_idx: positive_idx = random.choice(examples_for_class) x[0, index] = train_dataset[anchor_idx][0] x[1, index] = train_dataset[positive_idx][0] # x[0, random_images[index]] = train_dataset[anchor_idx][0] # x[1, random_images[index]] = train_dataset[positive_idx][0] yield x登录后复制 ? ?In [12]
examples = next(read_iterator(num_batches=1000))print(examples.shape)登录后复制 ? ? ? ?
(2, 40, 3, 224, 224)登录后复制 ? ? ? ?
4.模型组网:把图片转换为高维的向量表示的网络,然后计算图片在高维空间表示时的相似度
In [13]import paddleimport paddle.nn.functional as Fclass MyNet(paddle.nn.Layer): def __init__(self): super(MyNet, self).__init__() self.conv1 = paddle.nn.Conv2D(in_channels=3, out_channels=224, kernel_size=(3, 3), stride=2) self.conv2 = paddle.nn.Conv2D(in_channels=224, out_channels=112, kernel_size=(3,3), stride=2) self.conv3 = paddle.nn.Conv2D(in_channels=112, out_channels=56, kernel_size=(3,3), stride=2) self.conv4 = paddle.nn.Conv2D(in_channels=56, out_channels=64, kernel_size=(3,3), stride=2) self.conv5 = paddle.nn.Conv2D(in_channels=64, out_channels=128, kernel_size=(3,3), stride=2) self.gloabl_pool = paddle.nn.AdaptiveAvgPool2D((1,1)) self.fc = paddle.nn.Linear(in_features=128, out_features=8) def forward(self, x): x = self.conv1(x) x = F.relu(x) x = self.conv2(x) x = F.relu(x) x = self.conv3(x) x = F.relu(x) x = self.conv4(x) x = F.relu(x) x = self.conv5(x) x = F.relu(x) x = self.gloabl_pool(x) x = paddle.squeeze(x, axis=[2, 3]) x = self.fc(x) x = x / paddle.norm(x, axis=1, keepdim=True) return x登录后复制 ? ?In [14]
model=MyNet()model.train()paddle.summary(model,(1,3, 224, 224)) # 可视化模型组网结构和参数登录后复制 ? ? ? ?
W0623 11:35:05.132016 197 gpu_context.cc:278] Please NOTE: device: 0, GPU Compute Capability: 7.0, Driver API Version: 11.2, Runtime API Version: 10.1W0623 11:35:05.136283 197 gpu_context.cc:306] device: 0, cuDNN Version: 7.6.登录后复制 ? ? ? ?
------------------------------------------------------------------------------- Layer (type) Input Shape Output Shape Param # =============================================================================== Conv2D-1 [[1, 3, 224, 224]] [1, 224, 111, 111] 6,272 Conv2D-2 [[1, 224, 111, 111]] [1, 112, 55, 55] 225,904 Conv2D-3 [[1, 112, 55, 55]] [1, 56, 27, 27] 56,504 Conv2D-4 [[1, 56, 27, 27]] [1, 64, 13, 13] 32,320 Conv2D-5 [[1, 64, 13, 13]] [1, 128, 6, 6] 73,856 AdaptiveAvgPool2D-1 [[1, 128, 6, 6]] [1, 128, 1, 1] 0 Linear-1 [[1, 128]] [1, 8] 1,032 ===============================================================================Total params: 395,888Trainable params: 395,888Non-trainable params: 0-------------------------------------------------------------------------------Input size (MB): 0.57Forward/backward pass size (MB): 24.07Params size (MB): 1.51Estimated Total Size (MB): 26.16-------------------------------------------------------------------------------登录后复制 ? ? ? ?
{'total_params': 395888, 'trainable_params': 395888}登录后复制 ? ? ? ? ? ? ? ?
5.模型训练,在这里我们使用matmul计算图片间的相似度。
In [19]def train(model): print('start training ... ') model.train() epoch_num = 20 num_batches=100 opt = paddle.optimizer.Adam(learning_rate=0.0001,parameters=model.parameters()) for epoch in range(epoch_num): for batch_id, data in enumerate(read_iterator(num_batches=100)): anchors_data, positives_data = data[0], data[1] anchors = paddle.to_tensor(anchors_data) positives = paddle.to_tensor(positives_data) anchor = model(anchors) positive = model(positives) #通过余弦相似度进行图片间的相似度计算 similarities = paddle.matmul(anchor, positive, transpose_y=True) sparse_labels = paddle.arange(0, num_classes, dtype='int64') labels=np.array(sparse_labels).reshape(len(sparse_labels),1) labels = paddle.to_tensor(labels) loss = F.cross_entropy(similarities, sparse_labels) acc = paddle.metric.accuracy(similarities,labels) if batch_id % 100 == 0: print(”epoch: {}, batch_id: {}, loss is: {}“.format(epoch, batch_id, loss.numpy())) loss.backward()# 反向传播 opt.step()# 更新参数 opt.clear_grad()# 梯度清零登录后复制 ? ?In [20]
train(model)登录后复制 ? ?
6.模型预测
这里我们分别取出数据集跟测试集标签为0-40进行预测,因为我们前面模型训练的狗鼻子类别只有40类,所以在这我们取0-40,也就是标签0-40。
In [21]test_pp=[]train_pp=[]for data in train_dataset: img,label=data if label<=[40]: test_pp.append(img)for data in test_dataset: img,label=data if label<=[40]: train_pp.append(img)test_pp=paddle.to_tensor(test_pp)train_pp=paddle.to_tensor(train_pp)test_pp=model(test_pp)train_pp=model(train_pp)similarities = paddle.matmul(test_pp, train_pp, transpose_y=True) sparse_labels = paddle.arange(0, len(test_pp), dtype='int64')labels=np.array(sparse_labels).reshape(len(sparse_labels),1)labels = paddle.to_tensor(labels)loss = F.cross_entropy(similarities, sparse_labels)acc = paddle.metric.accuracy(similarities,labels)print(”loss is: {}, acc is: {}“.format(loss.numpy(), acc.numpy()))登录后复制 ? ? ? ?
loss is: [3.8872852], acc is: [0.36585367]登录后复制 ? ? ? ?
9.总结
通过Resnet50模型进行狗鼻子预测,我们训练25轮取得98%的精度。
? ? ? ?通过余弦相似度我们所预测的精度只有30%几。训练的轮次和数据量过少可能导致模型过拟合。后续将会进行补充与处理。
来源:https://www.php.cn/faq/1425494.html
免责声明:文中图文均来自网络,如有侵权请联系删除,心愿游戏发布此文仅为传递信息,不代表心愿游戏认同其观点或证实其描述。
相关文章
更多-

- nef 格式图片降噪处理用什么工具 效果如何
- 时间:2025-07-29
-

- 邮箱长时间未登录被注销了能恢复吗?
- 时间:2025-07-29
-

- Outlook收件箱邮件不同步怎么办?
- 时间:2025-07-29
-

- 为什么客户端收邮件总是延迟?
- 时间:2025-07-29
-

- 一英寸在磁带宽度中是多少 老式设备规格
- 时间:2025-07-29
-

- 大卡和年龄的关系 不同年龄段热量需求
- 时间:2025-07-29
-

- jif 格式是 gif 的变体吗 现在还常用吗
- 时间:2025-07-29
-

- hdr 格式图片在显示器上能完全显示吗 普通显示器有局限吗
- 时间:2025-07-29
大家都在玩
大家都在看
更多-
- UltraEdit怎么设置自动转换到DOS格式
- 时间:2025-10-13
-
- UltraEdit怎么关闭整字匹配
- 时间:2025-10-13
-

- 三角洲行动简单又好听游戏网名
- 时间:2025-10-13
-

- 抖音定时发布怎么取消?发布作品正确方法是什么?
- 时间:2025-10-13
-

- 小红书怎么注册新的账号?它起号运营怎么做?
- 时间:2025-10-13
-

- 快手评论被删除的原因怎么查?评论被删除有哪些原因?
- 时间:2025-10-13
-

- 不让别人看抖音收藏的音乐怎么弄?收藏的音乐在哪里找到?
- 时间:2025-10-13
-

- 小红书企业号认证流程是什么?企业号认证的条件是什么?
- 时间:2025-10-13


