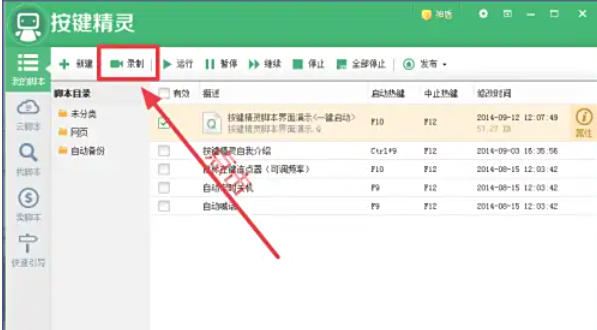
cool edit proИҐФлТфµДПкПёІЩЧчІЅЦи
К±јдЈє2026-02-23 | ЧчХЯЈє | ФД¶БЈє0cool edit proИҐФлТфµДПкПёІЩЧчІЅЦи

1Ўў°ІЧ°єГcool edit proєуЈ¬ґтїЄёГИнјюЈ¬ЅшИлЖдЅзГж;

2ЎўµгОДјюЈ¬СЎФсґтїЄГьБо;

3ЎўХТµЅРиТЄИҐФ봦АнµДТфАЦЈ¬СЎЦРЛьЈ¬И»єуµгЎ°ґтїЄЎ±;

4ЎўТфЖµОДјюѕНµјИлµЅcool edit proАпБЛ;

5ЎўФЪР§№ыІЛµҐХТµЅФлТфПыіэЈ¬µгЎ°Л»ЙщПыіэЎ±;

6ЎўµгИ·¶Ё;

7ЎўїЄКјПыіэФлЙщ;

8ЎўёщѕЭРиТЄЈ¬ФЩФЪР§№ыЦРСЎИЎЖдЛьГьБоЈ¬ИзЎ°ЅµФлЖчЎ±Ј¬јМРшЅшРРФлЙщґ¦АнЈ¬Ц±µЅВъТвОЄЦ№ЎЈ

ЙПГжѕНКЗcool edit proИҐФлТфµДПкПёІЩЧчІЅЦиЈ¬РЎ»п°йГЗ¶јС§»бБЛВр

АґФґ:https://www.downza.cn/xy/101344.html
ГвФрЙщГчЈєОДЦРНјОДѕщАґЧФНшВзЈ¬ИзУРЗЦИЁЗлБЄПµЙѕіэЈ¬РДФёУОП··ўІјґЛОДЅцОЄґ«µЭРЕПўЈ¬І»ґъ±нРДФёУОП·ИПН¬Жд№Ыµг»тЦ¤КµЖдГиКцЎЈ
Па№ШОДХВ
ёь¶а-
- °ґјьѕ«БйФхГґВјЦЖ
- К±јдЈє2026-02-25
-

- °ґјьѕ«БйФхГґЦЖЧчКу±кБ¬µг
- К±јдЈє2026-02-25
-
- °ґјьѕ«БйФхГґХТЖБД»Чш±к
- К±јдЈє2026-02-25
-

- qqУОП·ФхГґїЄЖфУОП·СыЗлНЁЦЄ
- К±јдЈє2026-02-24
-

- qqУОП·ФхГґЙиЦГАП°ејь
- К±јдЈє2026-02-24
-

- qqУОП·ФхГґФЪqqЅзГжМнјУqqУОП·
- К±јдЈє2026-02-24
-

- ie9ФхГґ№Ш±ХSmartScreenЙёСЎЖч
- К±јдЈє2026-02-24
-

- ie9ФхГґґтїЄёХёХ№Ш±ХµДНшТі
- К±јдЈє2026-02-24
ѕ«СЎєПјЇ
ёь¶аґујТ¶јФЪНж
-
 Ў¶ПыКЕµД№вГўЈєА§КЮЎ·ёьєГµД»рСжЕзЙдЗ№MOD v1.0
ПВФШ
Ў¶ПыКЕµД№вГўЈєА§КЮЎ·ёьєГµД»рСжЕзЙдЗ№MOD v1.0
ПВФШ
-
 Ў¶ЙП№ЕѕнЦб5ЈєМмјКЦШЦЖ°жЎ·Е®ОЧЕ®ЛжґУ»іMOD v1.0
ПВФШ
Ў¶ЙП№ЕѕнЦб5ЈєМмјКЦШЦЖ°жЎ·Е®ОЧЕ®ЛжґУ»іMOD v1.0
ПВФШ
-
 Ў¶РЗВ¶№ИОпУпЎ·ЕдЕјЕ©ЙбК±јд±нMOD v1.0
ПВФШ
Ў¶РЗВ¶№ИОпУпЎ·ЕдЕјЕ©ЙбК±јд±нMOD v1.0
ПВФШ
-
 Ў¶ѕшµШЗ±±ш2Ў·ѕшЗшБг°в»ъµДѕС»чІЅЗ№MOD v1.0
ПВФШ
Ў¶ѕшµШЗ±±ш2Ў·ѕшЗшБг°в»ъµДѕС»чІЅЗ№MOD v1.0
ПВФШ
-
 Ў¶ёрТ¶АЧµАёґїМ°жЈєі¬Б¦±шНЕЖжМ·Ў·v1.0-v1.1 ИэК®ИэПоРЮёДЖч v1.0-v1.1
ПВФШ
Ў¶ёрТ¶АЧµАёґїМ°жЈєі¬Б¦±шНЕЖжМ·Ў·v1.0-v1.1 ИэК®ИэПоРЮёДЖч v1.0-v1.1
ПВФШ
-
 Ў¶№ЦОпБФИЛЈє»ДТ°Ў·°¬¶ыµЗ·Ё»·КЁЧУґу№MOD v1.0
ПВФШ
Ў¶№ЦОпБФИЛЈє»ДТ°Ў·°¬¶ыµЗ·Ё»·КЁЧУґу№MOD v1.0
ПВФШ
-
 Ў¶ЙП№ЕѕнЦб5ЈєМмјКЦШЦЖ°жЎ·ёьєГµДЅКРМјЬґуМьMOD v1.0
ПВФШ
Ў¶ЙП№ЕѕнЦб5ЈєМмјКЦШЦЖ°жЎ·ёьєГµДЅКРМјЬґуМьMOD v1.0
ПВФШ
-
 Ў¶»ГКЮЕБВіЎ·ЦмИёєЪ°µЧЕЙ«MOD v1.0
ПВФШ
Ў¶»ГКЮЕБВіЎ·ЦмИёєЪ°µЧЕЙ«MOD v1.0
ПВФШ
ИИГЕ»°Мв


ґујТ¶јФЪїґ
ёь¶а-

- РЫРДЦ®ЙПжзЖпНж·Ё№ҐВФ
- К±јдЈє2026-02-24
-
- ИэДкУЦИэДкКЗКІГґТвЛјЈїіцЧФДДАпЈїКЗКІГґТвЛј
- К±јдЈє2026-02-24
-
- СтМгЙЅЦ®»кОдХЯСЫХЦФхГґ»сИЎ
- К±јдЈє2026-02-24
-
- ОЮПЮВЦ»ШЧоРВНЁУГ¶Т»»ВлёЈАыєПјЇ
- К±јдЈє2026-02-24
-

-

- С§ФБУпБг»щґЎЧФС§appГв·С
- К±јдЈє2026-02-24
-

- ЧЁГЕїґМ©ѕзЧоИ«µДИнјюУРДДР©
- К±јдЈє2026-02-24
-

- ДЮєзИЛЙъХЅ¶·ДЈКЅ№ҐВФґуИ«
- К±јдЈє2026-02-24